Thinking about a fresh, new look but dreading the salon price tag? You're not alone! Many are turning to the increasingly popular method of the bob hair cut diy to achieve salon-worthy styles at home. It might sound intimidating, but with the right guidance and a steady hand, you can absolutely rock a DIY bob. This article breaks down the process into manageable steps, from gathering your essential tools to mastering the cut and styling it like a pro. We'll walk you through prepping your hair, executing the cut with confidence, and even troubleshooting common mistakes. Whether you're aiming for a classic chin-length bob, a trendy textured bob, or something in between, get ready to unleash your inner stylist. So, grab your scissors and let's dive into the world of DIY bob haircuts – your journey to a chic and affordable new 'do starts now!
Essential Tools for Your DIY Bob Hair Cut
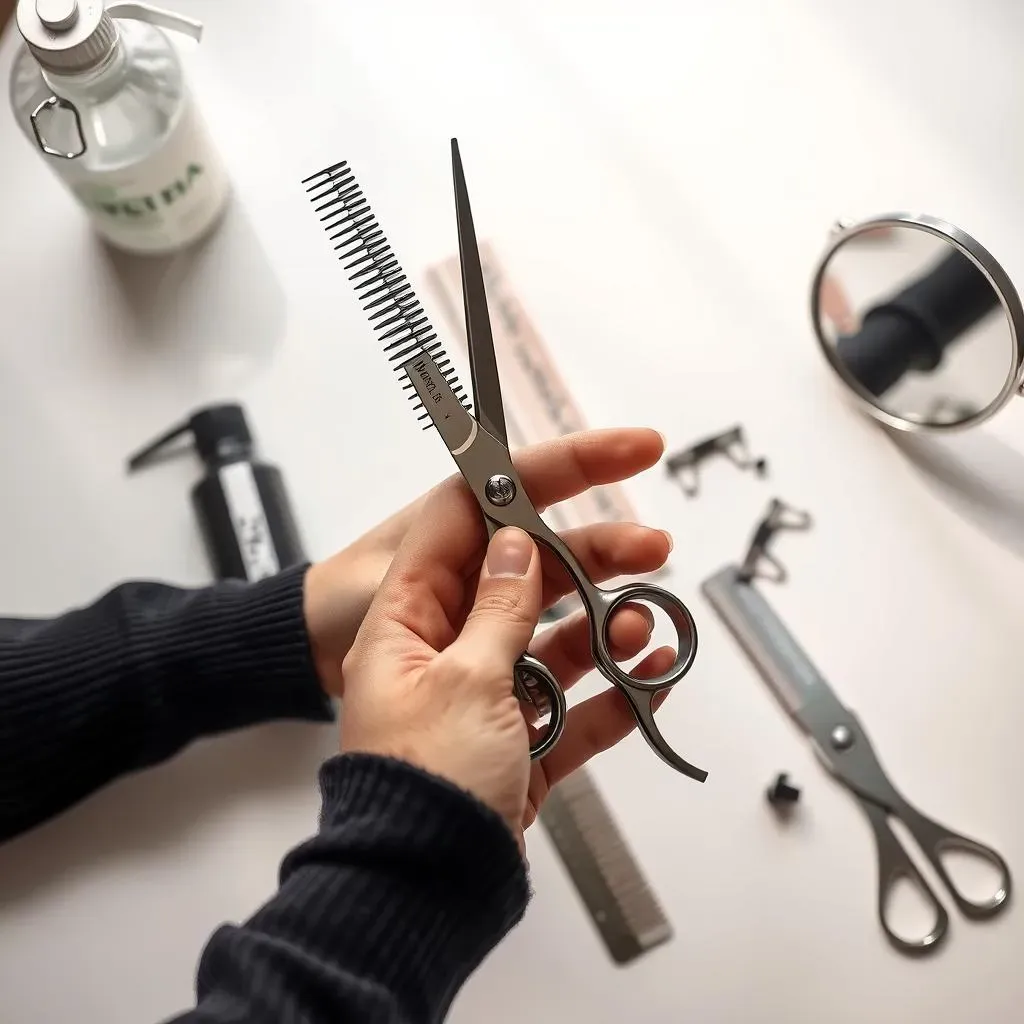
Essential Tools for Your DIY Bob Hair Cut
The Must-Have Shears
Let's be real, using dull kitchen scissors just isn't going to cut it (pun intended!). Investing in a good pair of hair cutting shears is crucial for achieving clean, even lines. Look for shears specifically designed for hair cutting – they'll be sharper and more precise than your everyday scissors. Think of it as an investment in your hair's future! Don't skimp here; a quality pair will last you through many DIY bobs to come.
Consider the size and weight of the shears too. You want something that feels comfortable in your hand and allows for easy maneuvering. Some shears even have ergonomic handles to reduce hand fatigue, which is a lifesaver when you're trying to concentrate on getting that perfect angle. Remember, sharp shears equal a sharp-looking bob!
Beyond Scissors: Combs, Clips, and More
so you've got the shears sorted, but don't think that's all you need! A good comb is your best friend for creating clean sections and ensuring an even cut. Opt for a fine-tooth comb for precision. Hair clips are also essential for keeping sections out of the way while you're working. Trust me, you don't want rogue strands messing up your masterpiece.
And speaking of masterpieces, don't forget a mirror! A large mirror is a must for seeing the overall shape, and a handheld mirror is super helpful for checking the back. Good lighting is also key – you want to be able to see exactly what you're doing. Finally, a spray bottle filled with water is handy for keeping your hair damp, which makes it easier to cut. These seemingly small tools can make a huge difference in the final result of your DIY bob hair cut.
- Hair Cutting Shears: Invest in quality!
- Fine-Tooth Comb: For precise sectioning.
- Hair Clips: Keep sections out of the way.
- Mirrors: A large one and a handheld one.
- Spray Bottle: Keep hair damp.
Prep Work: Getting Your Hair Ready for a DIY Bob
Prep Work: Getting Your Hair Ready for a DIY Bob
Clean Hair, Clear Vision
First things first: start with clean, dry hair. Freshly washed hair is easier to manage and cut evenly. Avoid using heavy conditioners or styling products that can weigh your hair down or make it slippery. Why dry? Because wet hair stretches, and you might end up with a bob that's shorter than you intended once it dries. Think of it like tailoring a garment – you always work with the fabric in its natural state for the most accurate fit. This simple step is vital for a successful DIY bob!
Once your hair is clean and dry, give it a good brush to remove any knots or tangles. This will ensure that your comb glides smoothly through your hair during the cutting process, preventing any snags or uneven sections. A smooth canvas is key for creating a flawless bob. Plus, brushing your hair stimulates the scalp, promoting blood flow and overall hair health – a win-win!
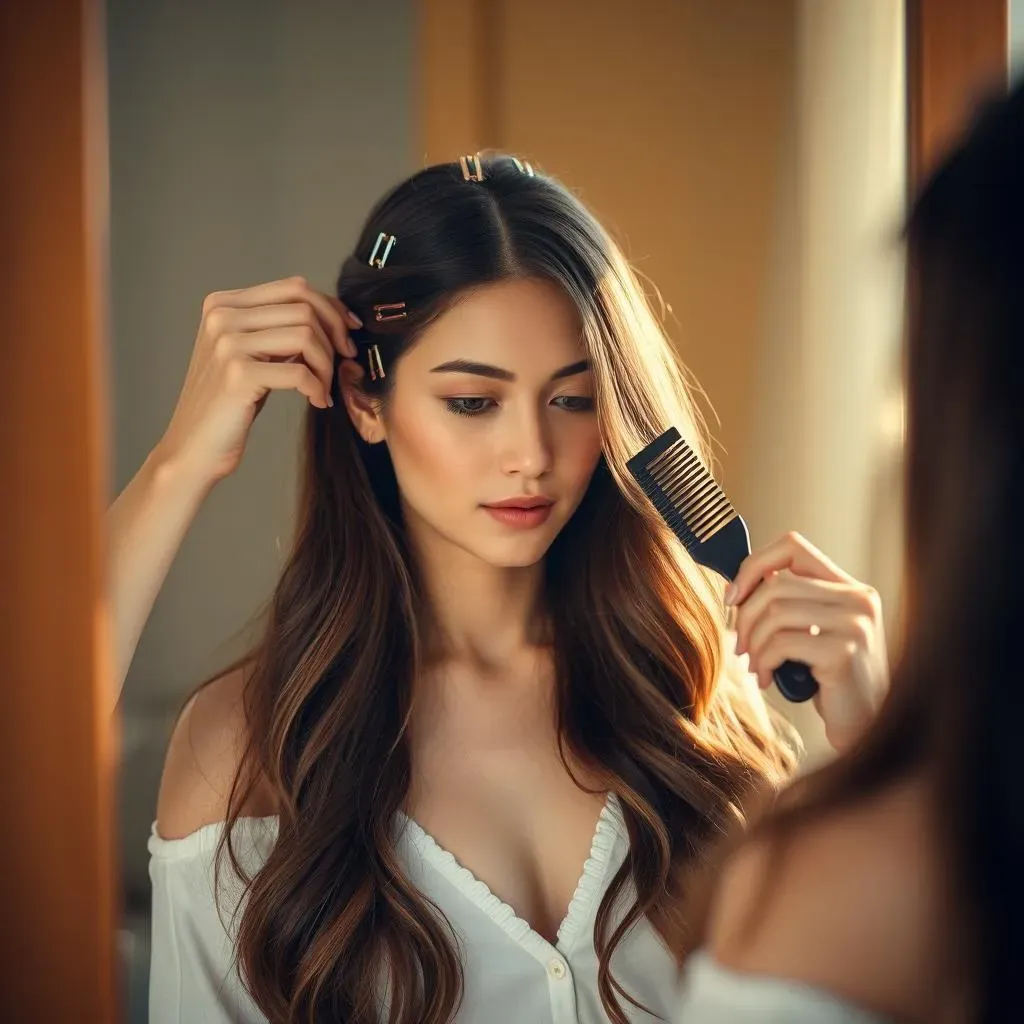
Sectioning for Success
Now comes the crucial part: sectioning! Divide your hair into manageable sections using your comb and hair clips. A common method is to create a center part and then divide the hair into three main sections: two in the front and one in the back. Secure each section with a clip to keep it out of the way. The number of sections you create will depend on the thickness of your hair – thicker hair may require more sections for better control. Proper sectioning is the foundation of an even and balanced bob. Think of it like dividing a painting into sections – it allows you to focus on each area individually and ensure that the overall composition is harmonious.
For an even more precise cut, you can further divide each of these main sections into smaller subsections. This is especially helpful if you're new to cutting hair or if you're aiming for a more complex bob style, like an A-line bob or an inverted bob. The smaller the sections, the more control you'll have over the length and shape of your bob. Remember, patience and precision are your allies in the world of DIY bob haircuts. Take your time, section carefully, and you'll be well on your way to achieving a stunning new look.
Step | Description |
|---|---|
1 | Wash and dry hair thoroughly. |
2 | Brush to remove all knots and tangles. |
3 | Create a center part. |
4 | Divide hair into three main sections (two front, one back). |
5 | Secure each section with a hair clip. |
StepbyStep: Cutting Your Own Bob Hair Cut at Home

StepbyStep: Cutting Your Own Bob Hair Cut at Home
The First Cut: Establishing the Length
Alright, deep breaths! This is where the magic (or potential mayhem) happens. Start by taking a small subsection from the back section of your hair. Hold it taut between your fingers and decide how much length you want to chop off. Remember, you can always cut more, but you can't glue it back on! So, err on the side of caution and start with a smaller trim. Use your sharp shears to make a clean, even cut across the subsection. This first cut will serve as your guide for the rest of the back section.
Now, working subsection by subsection, use your initial cut as a guide to trim the remaining hair in the back section. Always hold the hair taut and make clean, even cuts. Avoid choppy or jagged lines by keeping your shears steady and your hand relaxed. Once you've completed the back section, move on to the front sections, using the same technique. Remember to constantly check the length and balance of your bob in the mirror as you go. It's like sculpting – you're gradually shaping your hair into the perfect bob!
Step | Action | Tip |
|---|---|---|
1 | Take a small subsection from the back. | Don't take too much at once. |
2 | Decide on the length and make the first cut. | Start with a smaller trim. |
3 | Use the first cut as a guide for the rest of the back section. | Hold hair taut and make clean cuts. |
4 | Repeat on the front sections. | Constantly check the balance in the mirror. |
Refining the Shape: Point Cutting and Texturizing
Once you've established the overall length of your bob, it's time to refine the shape and add some texture. Point cutting is a great technique for softening the edges of your bob and preventing it from looking too blunt. To point cut, hold your shears vertically and make small, angled snips into the ends of your hair. This will create a softer, more natural-looking finish. You can also use point cutting to add subtle layers to your bob, which can create volume and movement.
If you want to add even more texture to your bob, consider using a hair razor. A hair razor can create soft, piece-y layers that add dimension and interest to your haircut. However, razors can be tricky to use, so it's important to proceed with caution and watch some tutorials before attempting this technique. Remember, the goal is to create a bob that's uniquely you! Don't be afraid to experiment with different techniques and styles until you find the perfect look for your face shape and hair type. With a little practice and a lot of patience, you can master the art of the DIY bob hair cut.
Styling and Maintaining Your New DIY Bob Haircut

Styling and Maintaining Your New DIY Bob Haircut
Everyday Styling: Quick and Easy Looks
Alright, you've got your DIY bob, now what? Styling is where you can really personalize your look. For a quick and easy everyday style, try a simple side part and a touch of texturizing spray. This will add volume and movement to your bob without requiring a lot of effort. You can also use a flat iron to create a sleek and polished look, or a curling iron to add soft waves. The beauty of a bob is its versatility – it can be dressed up or down to suit any occasion. Experiment with different products and techniques until you find the styles that work best for you and your hair type. Remember, confidence is the best accessory!
Don't underestimate the power of a good hair product. A lightweight mousse can add volume and hold, while a shine serum can smooth frizz and add a healthy glow. If you're using heat styling tools, be sure to apply a heat protectant spray to prevent damage. And for those days when you just don't have time to style your hair, a cute headband or a stylish barrette can instantly elevate your look. The key is to have fun and embrace the effortless chicness of your new DIY bob haircut.
Style | Description | Products |
|---|---|---|
Side Part & Texture | Effortless volume and movement. | Texturizing spray. |
Sleek & Polished | A classic and sophisticated look. | Flat iron, shine serum. |
Soft Waves | Romantic and feminine. | Curling iron, heat protectant. |
Maintaining the Shape: Trims and Touch-Ups
To keep your DIY bob looking its best, regular trims are essential. Depending on how quickly your hair grows, you'll likely need a trim every 4-6 weeks to maintain the shape and prevent split ends. If you're feeling brave, you can even trim your bob yourself using the same techniques you used for the initial cut. However, if you're not confident, it's always best to visit a professional stylist for a trim. They can also help you refine the shape of your bob and address any unevenness that may have occurred over time.
In addition to regular trims, it's also important to take care of your hair to prevent damage and maintain its health. Use a gentle shampoo and conditioner, avoid over-washing, and protect your hair from heat and sun exposure. A healthy hair care routine will not only keep your bob looking great, but it will also promote overall hair growth and vitality. Remember, a little TLC goes a long way in maintaining the beauty and longevity of your DIY bob haircut.
Troubleshooting Common DIY Bob Hair Cut Mistakes

Troubleshooting Common DIY Bob Hair Cut Mistakes
Uneven Length: The Dreaded Slant
so you've chopped away, and now you're staring at a bob that's... noticeably longer on one side. Don't panic! This is probably the most common bob hair cut diy mishap. The fix? Go back to your sectioning. Make sure your hair is evenly divided and that your part is straight. Then, carefully compare both sides in the mirror. Identify the longer side and, using small snips, gradually trim it to match the shorter side. Remember, less is more! It's easier to take off more hair than to magically grow it back.
Pro tip: Use your fingers as a guide. Hold a section of hair on one side between your fingers, noting the length. Then, hold a similar section on the other side and compare. This will help you pinpoint exactly where the unevenness lies. And don't be afraid to ask a friend for a second opinion – sometimes a fresh pair of eyes can spot what you're missing. With a little patience and attention to detail, you can conquer the dreaded slant and achieve a perfectly balanced bob.
“The best way to fix a mistake is to learn from it. Don't get discouraged, just keep practicing.”
Choppy Ends: Taming the Texture
Another frequent frustration is ending up with choppy, uneven ends. This often happens when your shears aren't sharp enough, or when you're cutting at an angle. To smooth things out, try point cutting. Hold your shears vertically and make small, angled snips into the ends of your hair. This will soften the harsh lines and create a more blended effect. You can also use texturizing shears to remove some of the bulk and create a more piece-y look. Just be careful not to overdo it – you don't want to end up with a wispy, stringy bob!
If the choppiness is more severe, you might need to even out the overall length of your bob. Again, section your hair carefully and use your sharpest shears to make clean, even cuts. Remember to work slowly and methodically, constantly checking your progress in the mirror. And if you're still not happy with the results, don't hesitate to seek professional help. A stylist can quickly and easily correct any major mistakes and give you the bob of your dreams.
Mistake | Solution | Pro Tip |
|---|---|---|
Uneven Length | Compare sides, trim gradually. | Use fingers as a guide. |
Choppy Ends | Point cutting, texturizing shears. | Don't over-texturize. |
Too Short | Patience! Wait for it to grow, style creatively. | Embrace accessories. |
Cutting Too Short: The Ultimate Regret
this is the one we all fear: accidentally chopping off way more hair than intended. It happens! Maybe your hand slipped, maybe you misjudged the length, or maybe you just got a little scissor-happy. Whatever the reason, you're now rocking a bob that's significantly shorter than you wanted. The good news is, it's not the end of the world. Hair grows back! In the meantime, focus on styling your shorter bob in creative ways. Experiment with different parts, textures, and accessories to find looks that you love.
You can also use styling products to add volume and lift, which can help to balance out the shorter length. Think mousse, root lifter, and texturizing spray. And don't be afraid to embrace the "pixie bob" look – it's chic, edgy, and totally on-trend. If you're really unhappy with the length, you can also consider getting extensions to add some extra length and volume. But most importantly, be patient and remember that your hair will eventually grow back. In the meantime, rock your shorter bob with confidence and own your unique style.
Conclusion: Rocking Your DIY Bob with Confidence
So, you've taken the plunge and given yourself a DIY bob hair cut! Hopefully, this guide has empowered you with the knowledge and confidence to maintain your stylish new look. Remember, practice makes perfect, and regular trims will keep your bob looking sharp. Don't be afraid to experiment with different styling techniques and products to find what works best for your hair type and desired look. While a DIY bob can be incredibly rewarding, know when to seek professional help. If you're struggling to achieve a particular style or need a more complex cut, a stylist can provide expert guidance. Ultimately, enjoy your new bob and the freedom of expressing your personal style!