Table of Contents
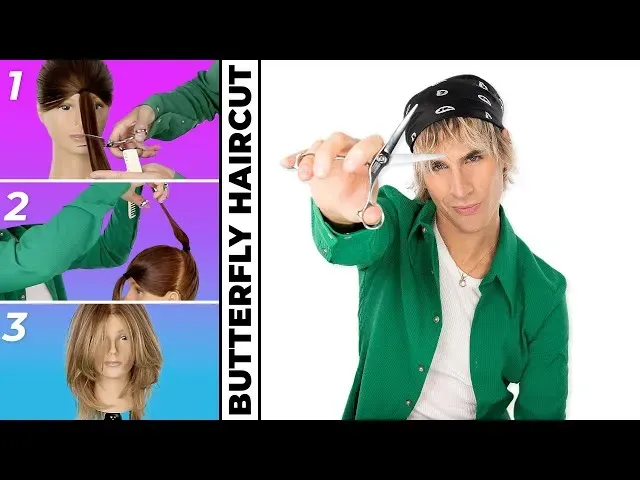
Everyone's talking about the butterfly cut. It's that layered look that gives you serious volume and movement without sacrificing much length. Think face-framing pieces that sweep back like wings, blending seamlessly into longer layers. It’s chic, it’s versatile, and suddenly, attempting a butterfly cut hair diy at home feels like a real possibility. Maybe you've seen the viral videos, or maybe you're just tired of salon prices. Whatever the reason, taking scissors to your own hair for this particular style feels... ambitious, right? It's not just a blunt trim; it involves strategic layering. This guide isn't going to pretend it's foolproof – it requires patience and a steady hand. But if you're ready to try tackling the butterfly cut hair diy, we'll walk you through the process, from prepping your tools to making those crucial first snips. We'll cover what you need, the actual steps involved in creating those face-framing and back layers, how to fix things if they go a bit sideways, and finally, how to style your new cut to make those "wings" really fly. Let's get started.
Why the Butterfly Cut DIY is Worth Considering (and the Risks)
Why the Butterfly Cut DIY is Worth Considering (and the Risks)
The Appeal of the At-Home Snip
Look, we get it. Salons cost money. A decent haircut can set you back a significant chunk of change, and the butterfly cut is everywhere right now, making that urge to try it yourself pretty strong. You've probably scrolled past countless TikToks and Reels showing people sectioning their hair into two ponytails and just chopping away, ending up with what looks like perfect, face-framing layers and bouncy volume. It makes the butterfly cut hair diy look deceptively simple. The idea of achieving this trendy style in your own bathroom, on your own schedule, and for the cost of a good pair of shears (if you don't already have them) is incredibly appealing. Plus, there's a certain satisfaction in saying, "Yeah, I did it myself."
Acknowledging the Potential Pitfalls
Now, let's pump the brakes slightly. While the internet makes the butterfly cut hair diy look like a walk in the park, it's not quite that easy. This cut relies on precise layering, shorter pieces around the face blending into longer ones, and getting the angles right is crucial. Messing up means uneven layers that are hard to blend, awkward lengths that don't frame your face, and potentially having to go to a stylist anyway to fix the damage – which might cost even more than the original cut would have. Cutting the back sections evenly and matching them to the front can be a serious challenge when you're working blind or relying on awkward mirror angles. It's not just about chopping; it's about technique.
So, before you grab those scissors, ask yourself:
- Are your scissors actually sharp hair shears, or kitchen scissors? (Spoiler: Kitchen scissors are a bad idea).
- Do you have a clear view of all sections of your hair, including the back?
- Are you prepared for the possibility that it might not turn out perfectly the first time?
- Do you have a backup plan (like a trusted stylist you can call in a panic)?
Gathering Your Arsenal: Essential Tools for Your DIY Butterfly Cut
Gathering Your Arsenal: Essential Tools for Your DIY Butterfly Cut
The Non-Negotiable: Sharp Hair Shears
first things first. You absolutely cannot, under any circumstances, use kitchen scissors, craft scissors, or those dull things you found at the bottom of a junk drawer. Trying to do a butterfly cut hair diy with the wrong tools is like trying to perform surgery with a butter knife. You need actual, sharp hair cutting shears. They don't have to be professional-grade thousand-dollar scissors, but they need to be designed for cutting hair cleanly. Dull blades bend the hair instead of cutting it, leading to split ends and a jagged, uneven mess. Invest in a decent pair; think of it as part of the cost savings compared to a salon visit.
Clipping, Combing, and Seeing What You're Doing
Beyond the shears, you need to get organized. Sectioning clips are crucial. You'll be dividing your hair into multiple sections, and good clips keep the hair you're not working on out of the way. Don't skimp here; flimsy clips won't hold thicker hair. A fine-tooth comb is essential for creating clean, straight parts and for combing through sections before you cut. This is where you smooth everything out to ensure an even line. And perhaps most importantly, you need mirrors. A large wall mirror and a handheld mirror are non-negotiable for seeing the back sections and checking your work from all angles. Trying to guess what's happening behind your head is a recipe for disaster.
Here’s a quick checklist:
- Sharp hair cutting shears (the star of the show)
- Sectioning clips (get several)
- Fine-tooth comb (for clean lines)
- Large mirror and a handheld mirror (for seeing everything)
- Cape or old towel (to keep hair off you)
Setting the Scene and Other Handy Bits
Think about your workspace. You need good lighting – natural light is best, but bright overhead lights work too. Make sure the area is easy to clean because hair gets everywhere. Having a spray bottle with water can be helpful for dampening sections if needed, although many prefer cutting dry hair for better accuracy with layering. Some people find a cutting cape or even just an old towel draped over their shoulders keeps the tiny trimmed hairs from itching their neck for the next three days. Having a trash can nearby makes cleanup easier. Basically, set yourself up for success, not a scavenger hunt for tools mid-chop during your butterfly cut hair diy attempt.
Sectioning and Snips: The Core Steps to Your Butterfly Cut Hair DIY
Dividing Your Mane: The Crucial First Step
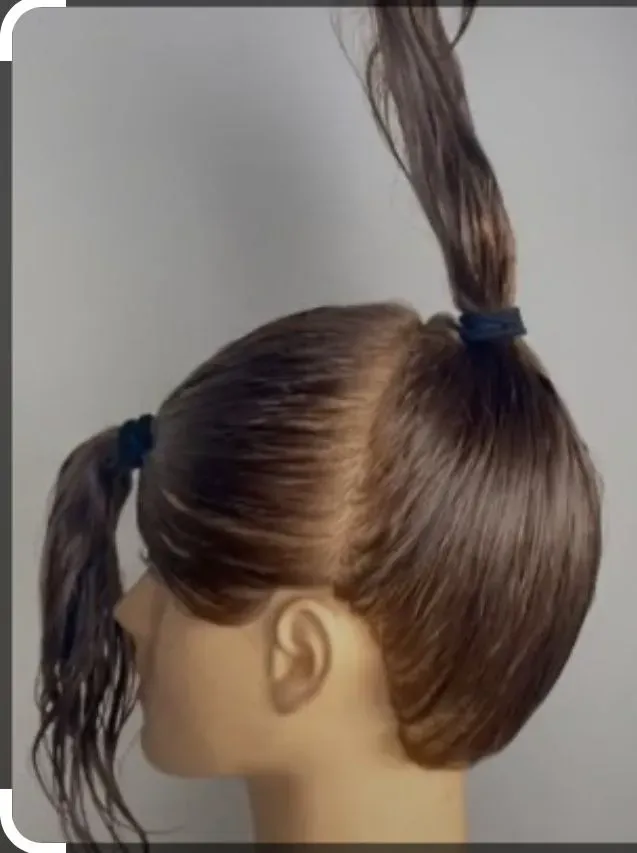
Alright, shears in hand, cape on, mirrors set. The very first, non-negotiable step for a successful butterfly cut hair diy is sectioning your hair properly. Imagine a line going straight across the top of your head, from ear to ear. This is your dividing line. Everything in front of this line is your "front" section – this will create those face-framing layers. Everything behind it is your "back" section, which gets longer, blending layers. Use your comb to make a clean, straight part. Gather the front section and secure it tightly in a ponytail right on top of your head, like a unicorn horn. The higher the ponytail, the shorter the face-framing layers will be. Make sure it's centered and smooth. Clip the back section out of the way completely.
Making the First Cut: The Front Section
Now for the part that might make your palms sweat: the first snip of your butterfly cut hair diy attempt. Take your front ponytail. Comb it straight up, ensuring there are no bumps or tangles. Hold the ponytail firmly between your index and middle fingers. Slide your fingers down to the desired length for your shortest face-framing pieces. Remember, you can always cut more off, but you can't put it back. A good rule of thumb for a classic butterfly cut is to aim for the shortest layers to hit somewhere between your chin and collarbone when dry and styled. Hold your fingers parallel to the floor. Now, take your sharp hair shears and make one clean cut straight across below your fingers. Release the ponytail and see what you’ve got. Don't panic if it looks a little blunt; we'll refine it later.
Before moving on, double-check:
- Is the front ponytail centered?
- Is the cut straight across below your fingers?
- Did you use sharp shears? (Seriously, don't skip this).
- Are the face-framing pieces roughly the length you intended?
Troubleshooting Your Butterfly Cut at Home: Fixing Common Glitches
Troubleshooting Your Butterfly Cut at Home: Fixing Common Glitches
Oops, My Front Layers Are Uneven!
so you took the plunge, made the cut on the front section for your butterfly cut hair diy, and now you've let it down and one side looks a little... shorter? Or maybe it's just generally choppy instead of a smooth transition? Don't panic. This is probably the most common glitch when doing this cut yourself. The key here is *not* to go hacking away trying to fix it blindly. First, make sure your hair is dry and styled roughly how you'd normally wear it. Sometimes wet hair lies differently. If it's still uneven, re-section that front part, smooth it out with your comb, and bring the ponytail back up. This time, instead of cutting straight across, try point cutting into the ends. Hold the scissors almost parallel to the hair strand and snip upwards into the very ends. This removes weight and helps soften the line, making small discrepancies less noticeable. Work slowly, taking off tiny amounts until the lengths look more balanced when dry.
The Back Section Looks... Interesting.
Cutting the back layers for your butterfly cut hair diy is arguably trickier because, well, you can't see it properly. If you've released the back ponytail and find jagged edges, uneven lengths, or layers that don't seem to blend at all, take a deep breath. Fixing the back often requires more mirror work. Try pulling sections of the back hair forward over your shoulder, comb it smooth, and check the length against the corresponding front layers. You want the back to be longer, obviously, but the layers should ideally connect somewhat smoothly. Again, point cutting is your friend for softening blunt lines and helping layers fall better. If it's seriously uneven, you might need to enlist a friend with a steady hand or, honestly, consider a quick trip to a stylist for a "clean-up." Sometimes admitting defeat on the back is better than making it worse.
Common Issues and Quick Fixes:
- Choppy front layers: Use point cutting to soften the ends.
- Uneven side lengths (front): Re-section, comb smooth, and trim the longer side carefully using point cutting.
- Jagged back ends: Pull sections forward, comb, and point cut to smooth.
- Layers not blending: Use point cutting vertically into the ends where layers meet to create a softer transition.
- Major screw-ups: Step away from the scissors and call a professional. Seriously.
Styling Secrets for Your New Butterfly Cut
Styling Secrets for Your New Butterfly Cut
Bringing the "Wings" to Life: Styling the Front Layers
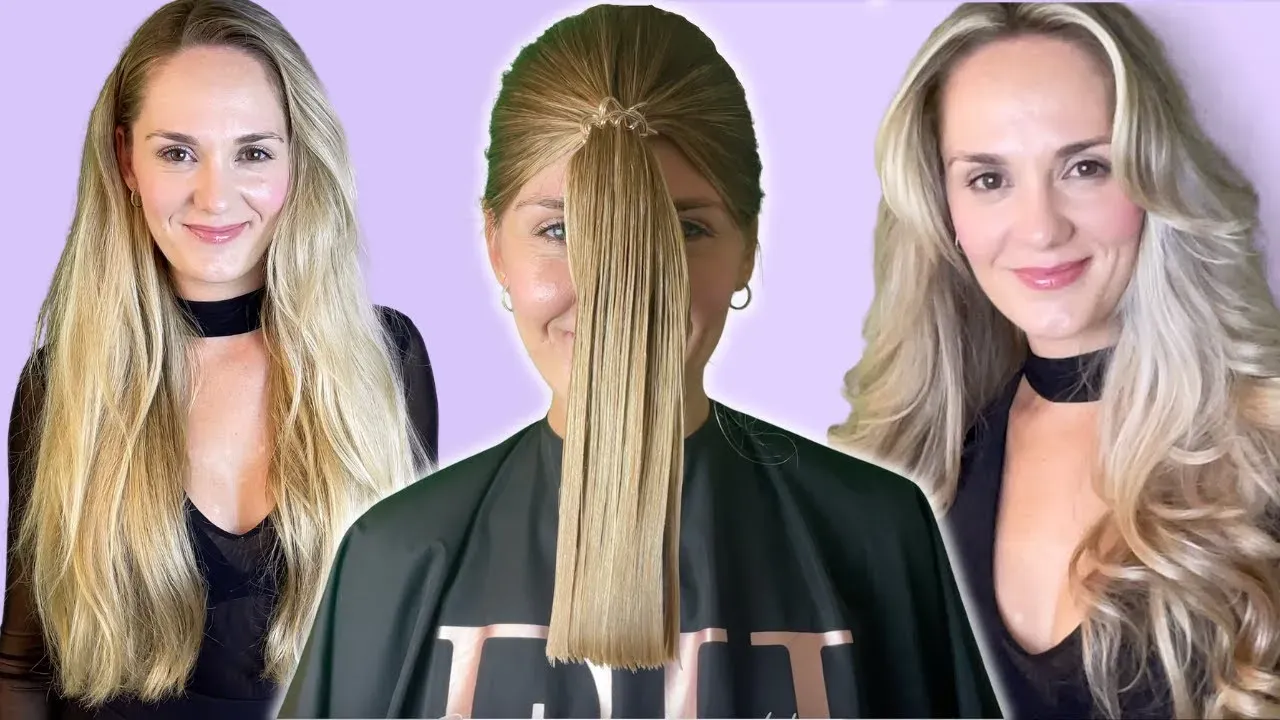
you've survived the cutting part of your butterfly cut hair diy. Now for the fun bit: making those layers actually look like the gorgeous, face-framing "wings" you see everywhere. The magic here often happens with a round brush and a blow dryer. After washing and applying a heat protectant (non-negotiable!), rough dry your hair until it's about 80% dry. Then, grab a medium or large round brush. Take sections of those front layers, place the brush underneath, and blow dry downwards, turning the brush away from your face at the ends. This creates that outward flick, the signature of the butterfly shape. Don't rush this; focus on getting tension on the brush and directing the heat. You can also use velcro rollers on these sections after blow drying for extra volume and hold while your hair cools.
Adding Volume and Movement to the Back
The back section of your butterfly cut might not have those dramatic face-framing pieces, but the layers are there to add volume and prevent your hair from looking flat. To style the back after your butterfly cut hair diy, you can continue with the round brush technique, lifting sections at the root and drying downwards or slightly under for a subtle curl. For a more effortless look, you can simply blow dry upside down to build volume at the roots, then smooth the ends with a brush. Texture sprays or volumizing mousses applied before drying can also make a huge difference in getting that airy, full look. Remember, the goal is movement and bounce, not stiff perfection. A little lived-in texture often looks best.
Tools and Products for Styling:
- Heat protectant spray (always!)
- Round brush (various sizes depending on desired curl)
- Blow dryer with a concentrator nozzle
- Velcro rollers (for extra hold)
- Volumizing mousse or spray
- Texture spray (optional, for piecey-ness)
So, How Did Your Butterfly Fly?
Alright, you took the plunge and attempted the butterfly cut hair diy. Whether you ended up with perfectly blended layers or something a little... more abstract, you learned something, right? It's definitely not the simplest cut to do on yourself, and salon stylists exist for a reason. But hey, you tried. You navigated the sectioning, made the cuts, and hopefully, avoided any major disasters. If it looks fantastic, pat yourself on the back – you've unlocked a new skill. If it needs a little tweaking, well, that's what bobby pins and dry shampoo are for, or maybe a quick trip to a professional to clean it up. The key takeaway is that the butterfly cut, even a DIY version, is about creating movement and shape. Wear it with confidence, regardless of how symmetrical those layers ended up. It’s just hair; it grows back.