Table of Contents
Everyone’s talking about the butterfly cut. Scroll through social media and you’ll see why – it’s that voluminous, face-framing, effortlessly cool look that seems to defy gravity. It promises movement, body, and a certain je ne sais quoi without sacrificing length. But how do you actually get this coveted style? If you've been wondering about thebutterfly cut hair how tonavigate getting this look, you're not alone. This isn't just some quick trim; it's a specific layering technique that creates the illusion of shorter hair around your face while maintaining longer lengths at the back. It’s designed to give you maximum impact with relatively low commitment, acting like a push-up bra for your hair. In the following sections, we’ll break down exactly what makes this cut flutter, guide you on how to talk to your stylist to ensure you get the right layers, share the best ways to style it for that signature bounce, and offer tips on keeping it looking fresh long after you leave the salon chair. Ready to ditch the flat hair and embrace some serious volume? Let's get into it.
Understanding the Butterfly Cut: Layers and Volume Explained
Understanding the Butterfly Cut: Layers and Volume Explained
The Illusion of Two Cuts
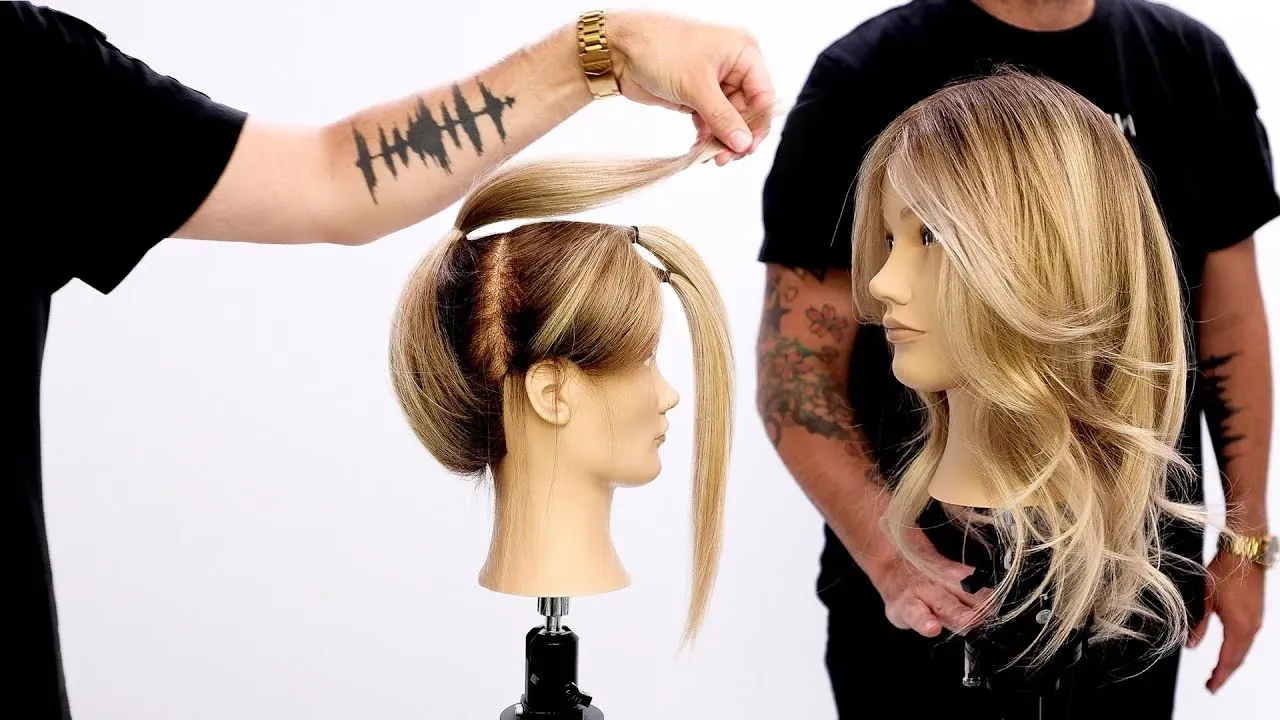
Forget everything you thought you knew about traditional layering. The butterfly cut isn't just choppy layers thrown in anywhere. It's a strategic approach designed to make it look like you have both short and long hair at the same time. Think of it as having face-framing layers, usually hitting somewhere around your chin or collarbone, that are distinctly shorter than the bulk of your length which falls below your shoulders. These shorter pieces are cut and styled to blend seamlessly into the longer sections, creating a fanned-out effect. It’s clever, really. You get the drama and lift of shorter layers around your face without actually sacrificing the long hair you've probably spent ages growing. It's the hair equivalent of wanting your cake and eating it too.
Layering for Lift and Movement
So, how does this trick work to give you that enviable volume? It's all in the weight removal and strategic placement. By cutting shorter layers around the face and crown, your stylist removes some of the heavy weight that can drag down longer hair. These lighter, shorter sections are much easier to lift and style, especially around the face where you want that bounce and shape. The longer layers underneath remain, providing the foundation and length. When styled, particularly with a round brush or rollers, the shorter layers kick out and blend into the longer ones, creating a cascade of hair that looks incredibly full and dynamic. It’s not magic; it’s just physics and a smart haircut.
- Shorter layers concentrated around the face and crown.
- Longer layers maintained throughout the back and lower lengths.
- Layers are blended to create a seamless transition.
- Removes weight to encourage lift and volume.
- Designed to create movement and bounce when styled.
Why "Butterfly"? The Fanning Effect
The name "butterfly cut" isn't just a catchy marketing term, although it certainly helps. It comes from the way the layers tend to fan out and separate, much like a butterfly's wings when styled. When you part your hair and bring the shorter face-framing layers forward, they look almost like a separate, shorter haircut. But when you sweep them back, they seamlessly integrate with the longer lengths, creating that flowing, layered look. This duality is key to the cut's appeal. It offers versatility – you can wear it looking like you have medium-length layered hair or pull the back up and pretend you have a chic, shorter style for the day. It’s a haircut that gives you options, which in the world of hair, is a rare and beautiful thing.
Butterfly Cut Hair: How to Ask Your Stylist for the Look
Butterfly Cut Hair: How to Ask Your Stylist for the Look
Talking the Talk: What Your Stylist Needs to Hear
you've decided you want the butterfly cut hair how to get it starts with a conversation. Walking into a salon and just saying "I want a butterfly cut" might get you something close, or it might get you layers that look nothing like the pictures you've been scrolling through. Stylists are skilled, but they aren't mind readers. You need to be specific. Bring pictures – lots of them, from different angles, on people with similar hair types and lengths to yours. Point out what you like in each photo: "I love how these shorter pieces frame her face," or "See how the longer layers still keep the length here?" Explain the desired effect: you want volume, movement, and the ability to wear it styled forward or back. Mention the key elements: short, face-framing layers that blend into longer lengths. Don't be afraid to ask questions either; a good stylist will walk you through what they plan to do and how it will work with your specific hair texture and density. Think of it less like ordering coffee and more like collaborating on a work of art that will sit on your head.
Styling Your Butterfly Cut Hair: How to Maximize Volume and Movement
Styling Your Butterfly Cut Hair: How to Maximize Volume and Movement
Blow Drying for That Signature Bounce
Alright, so you've got the cut. Now comes the fun part: making it look like those videos. When it comes tobutterfly cut hair how tostyle it for maximum impact, your blow dryer and a round brush are your best friends. Seriously. Start with damp, towel-dried hair. Apply a volumizing mousse or spray, especially at the roots and through the shorter layers. Section your hair – this makes a huge difference. Use your round brush to lift sections at the root as you dry, directing the airflow upwards. For the face-framing layers, wrap them around the brush and dry, then gently unravel or pin them up while they cool to lock in the shape. For the longer layers, you can use a larger round brush or just rough dry them until they're mostly dry, then finish with the brush for smoothness and a slight bend. The key is tension and lift at the roots and creating that outward flip or curl with the shorter pieces.
Curling or Waving for Effortless Movement
Maybe blow drying isn't your jam, or you want a different look. Hot tools are your next weapon. A large barrel curling iron or even a straightener can create beautiful waves that enhance the butterfly effect. When using a curling iron, try curling sections away from your face, especially those shorter layers. Don't hold the curl for too long; you want a soft wave, not a tight ringlet. For a more relaxed look, pull the curl straight down gently after releasing it from the iron. A straightener can create effortless bends and waves too – just clamp a section, rotate the straightener away from your face, and slide down. Remember to always use a heat protectant spray before you even think about bringing heat near your hair. Fried ends don't flutter.
What's your go-to product for adding volume before styling?
Enhancing Texture and Air Drying
Not every day requires a full blow-dry or hot tool session. Sometimes, you just want to let your hair do its thing, or maybe you have a texture that works well with minimal intervention. If you have wavy or curly hair, a good curl-enhancing cream or spray can help define your natural pattern while still allowing the layers to work their magic. Apply the product to damp hair, scrunch gently, and let it air dry or diffuse on a low heat setting. Even straight hair can benefit from a texturizing spray applied to dry hair, especially at the mid-lengths and ends of those shorter layers, to give it a bit of grip and separation. The goal is to encourage the layers to show themselves and create that airy, separated look. It’s about working with your hair, not against it.
Maintaining Your Butterfly Cut: Keeping Those Layers Fresh
Maintaining Your Butterfly Cut: Keeping Those Layers Fresh
Keeping That Flutter Alive: Regular Trims Are Non-Negotiable
real talk: that gorgeous, voluminous butterfly cut isn't going to maintain itself forever. Just like a real butterfly eventually needs to rest, your hair needs upkeep. Those face-framing layers, the magic behind the lift, are the first to lose their shape as they grow out. Split ends are the enemy of movement and will make your layers look scraggly instead of sleek and bouncy. You're looking at needing a trim roughly every 8-12 weeks, depending on how fast your hair grows and how well you treat it. Skipping trims is like buying a fancy car and never changing the oil – it might look good for a bit, but eventually, things go downhill fast. Find a stylist you trust who understands the cut; they'll know exactly which pieces need a little snip to bring the shape back to life without hacking off all your progress.
The Final Flourish: Embracing Your Butterfly Cut
So, there you have it. The butterfly cut isn't just a viral trend; it's a calculated layering technique designed to give your hair noticeable volume and movement without sacrificing significant length. We've covered what defines this style – those face-framing shorter layers blending seamlessly into longer lengths – and how crucial it is to communicate your vision clearly to your stylist, maybe even armed with a few photos. Styling isn't rocket science, but a little heat styling or the right product can elevate those layers from flat to fabulous. And yes, maintaining it requires a bit of attention to keep those layers from looking shapeless as they grow out. It's a style that offers significant payoff in terms of body and bounce, proving that sometimes, a strategic cut is all you need to feel like your hair got a serious upgrade. Now go forth and let those layers fly.