Table of Contents
Scrolling through social media, you've likely seen the "butterfly cut" everywhere. It’s the style promising face-framing layers and serious volume without sacrificing precious length. For those with long hair, this sounds like a dream – adding movement where it often feels heavy and flat. But paying salon prices every few months? Maybe not so dreamy. This is where the idea of an at-home butterfly cut long hair tutorial starts to look appealing, or perhaps slightly terrifying.
Why the Butterfly Cut Works for Long Hair
Why the Butterfly Cut Works for Long Hair
The Illusion of Layers Without Sacrificing Length
Alright, so you have long hair. You love the length, right? But sometimes it just hangs there. It feels heavy. It lacks... oomph. Enter the butterfly cut. The magic here isn't chopping off half your hair; it's creating the *illusion* of short layers around your face while keeping the bulk of your length in the back. Think of it like two haircuts in one, seamlessly blended. The shorter layers frame your face, giving you that soft, bouncy look, while the longer layers underneath maintain your overall length and add movement without making your hair feel thin or choppy.
Solving the Long Hair Problem: Volume and Movement
Long hair, bless its heart, can be a commitment. It takes ages to dry, can feel flat at the roots, and often lacks shape unless you spend serious time styling it. The butterfly cut tackles this head-on. By strategically adding shorter layers around the crown and face, you lighten the load. This allows your hair to lift more easily at the roots, giving you much-needed volume. The varied lengths create built-in movement, so your hair doesn't just lie there like a curtain. It bounces, it flows – it looks like you actually tried, even when you just rolled out of bed.
So, what problems does the butterfly cut specifically address for long hair?
- Lack of volume at the crown
- Hair feeling heavy and flat
- Minimal face-framing shape
- Hair looking shapeless when not styled
- Taking forever to dry and style
Tools You Need for Your Butterfly Cut Long Hair Tutorial
Tools You Need for Your Butterfly Cut Long Hair Tutorial
Sharp Scissors Are Non-Negotiable
Look, you’re not going to get a clean cut with kitchen scissors or the dull pair you use for crafts. Trying that is a fast track to split ends and a choppy mess that looks less like a butterfly and more like you fought a blender. For a successful butterfly cut long hair tutorial, you need actual hair scissors. They don't have to be professional-grade $500 shears, but a decent pair designed for cutting hair makes a massive difference. They're sharper, designed to glide through hair without bending or pulling, and give you a much more precise line. Think of it as investing in the foundation of your DIY haircut.
Sectioning and Prep Tools Make Life Easier
Attempting a butterfly cut without proper sectioning is like trying to bake a cake without measuring cups – possible, maybe, but probably not going to turn out right. You'll need a good comb, preferably one with both wide and fine teeth, to detangle and create clean sections. Hair ties or clips are crucial for holding those sections securely out of the way. You'll also want a spray bottle filled with water to dampen the hair slightly, which helps with control and getting a clean cut, especially if you're working with dry hair (though damp is often easier for beginners). A mirror setup where you can see the back and sides of your head is also pretty important unless you enjoy surprises.
Here’s a quick list of your essential gear:
- Sharp hair cutting scissors (not craft scissors!)
- Comb (wide and fine teeth)
- Hair ties or clips
- Spray bottle with water
- Mirror setup (front and back view)
- Towel or cape to keep hair off clothes
StepbyStep Butterfly Cut Long Hair Tutorial
StepbyStep Butterfly Cut Long Hair Tutorial
Breaking Down the DIY Method
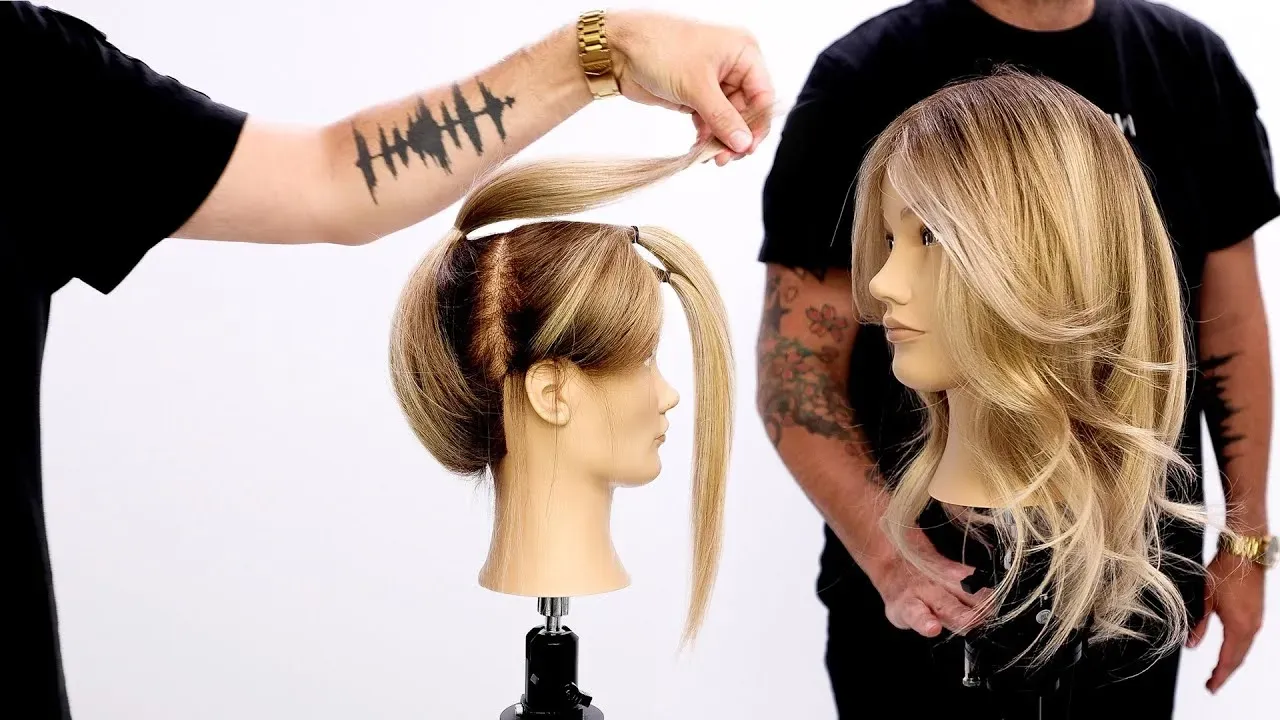
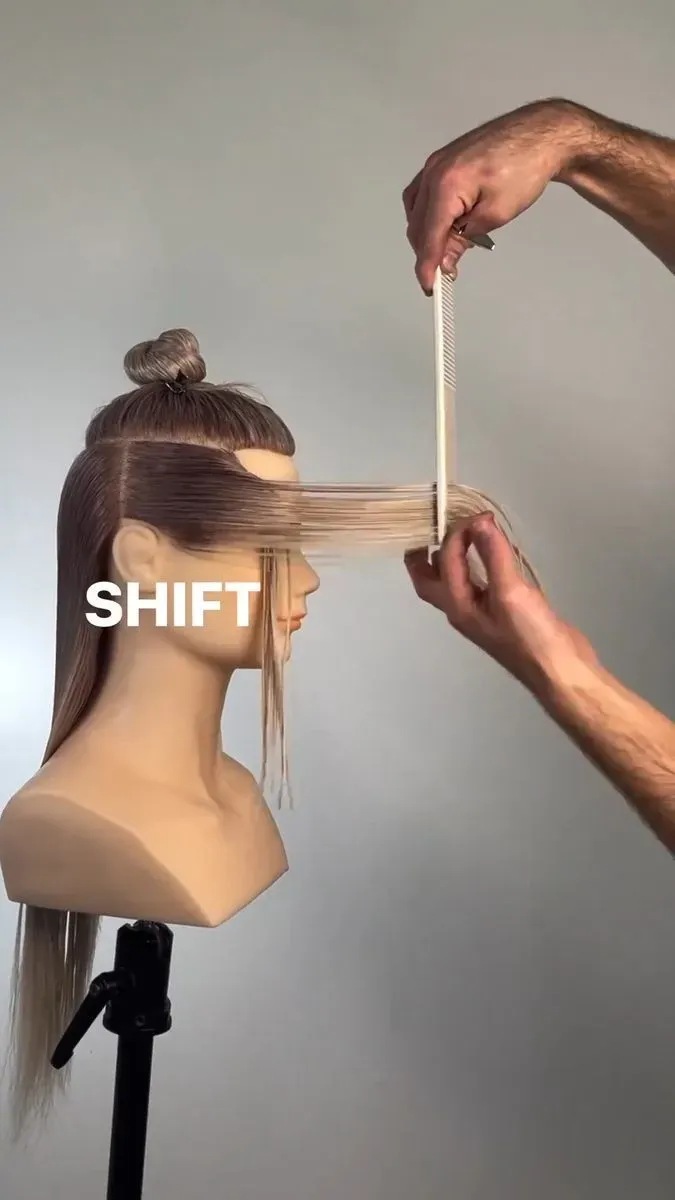
deep breath. You've got your sharp scissors and your sectioning tools. Now for the main event: the actual Step-by-Step Butterfly Cut Long Hair Tutorial. The most common DIY method involves creating two main sections, typically using ponytails – one on top of your head (think unicorn horn) and one lower down towards the back. The idea is that cutting these sections at different lengths creates the illusion of layers. The top ponytail gives you the shorter, face-framing pieces and volume on top, while the bottom ponytail helps blend those layers into your existing length. It sounds simple, and in theory it is, but precision matters. Don't just grab a chunk and snip; clean sections and careful cutting angles are key. Remember, you can always cut more off, but you can't glue it back on, so start conservative.
Fixing Common Mistakes in Your Butterfly Cut Long Hair Tutorial
Fixing Common Mistakes in Your Butterfly Cut Long Hair Tutorial
Uneven Layers? Don't Panic, Just Adjust
you've done the deed. You've snipped away, pulled the ponytails down, and... wait. One side looks a little longer than the other. Or maybe there's a distinct line where the top layers meet the bottom, looking less like a blended butterfly and more like a mullet's awkward cousin. Unevenness is probably the most common hiccup when you're doing a butterfly cut long hair tutorial at home. The fix isn't usually starting over. It's about careful observation and micro-adjustments. Dampen the hair again, comb it straight, and look for the discrepancies. Is one side heavier? Is a specific piece sticking out? Take tiny, controlled snips to even things out. Think of it like sculpting – remove small amounts until it looks right. Patience is your friend here, unlike that friend who told you this would be "super easy."
Dealing with the Dreaded 'Shelf' or Poor Blending
Another classic sign you might have fumbled the butterfly cut long hair tutorial slightly is the dreaded 'shelf' effect. This happens when the shorter top layers don't smoothly transition into the longer bottom layers, creating a visible line or a bulky step. It looks like someone put a bowl on your head and cut around it, but only halfway. This often comes down to the angle you held the scissors or the tension in your ponytails. Fixing it requires blending. You can try point cutting (holding the scissors vertically and snipping into the ends) to soften the line, or carefully taking vertical sections where the shelf is and cutting at a slight angle to connect the lengths. It's more advanced, sure, but better than walking around with a hair step stool.
Caught a shelf or uneven spot? Ask yourself:
- Did I use sharp scissors? (Seriously, dull scissors cause problems.)
- Were my sections clean and even?
- Was the tension consistent in my ponytails?
- Did I cut straight across, or at a slight angle?
- Am I trying to fix it dry or slightly damp? (Damp is usually better for precision.)
When You Cut Too Much (Because It Happens)
Alright, let's address the elephant in the room, or rather, the missing chunk of hair. Maybe you got a little scissor-happy during your butterfly cut long hair tutorial. Or perhaps you underestimated how much hair would be in that top ponytail. Whatever the reason, you've cut a piece shorter than you intended. This is where the "can't glue it back on" rule really stings. If it's just one small section that's too short, you might need to slightly shorten the pieces around it to blend it in. If you've taken off a significant amount more than you wanted, especially from the face-framing layers, your best bet is honestly to accept it and let it grow. Or, if it's truly dire, book an appointment with a professional and explain what happened. They might be able to salvage it or at least give you a plan for growing it out gracefully. Sometimes, the best fix is just time, and maybe a stylish headband.
Styling Your Fresh Butterfly Cut Long Hair
Blow Drying for Maximum Bounce
So, you’ve survived the butterfly cut long hair tutorial at home. Congrats. Now comes the fun part: making those new layers actually *do* something. The absolute best way to show off a butterfly cut is with a good blow-dry. This isn't just rough-drying; it's about intentional styling. Grab a round brush – the bigger, the better for long hair. Work in sections, starting with the face-framing layers. Pull them forward and blow dry *under* the brush, curving the ends away from your face. This makes them swoop and flick beautifully. For the longer layers, you can still use the round brush to create a soft bend or just smooth them out. Focus heat on the roots while lifting with the brush to really pump up the volume the cut is designed to give you. Finish with a blast of cool air to set it.
What's the goal when blow-drying your butterfly cut?
- Enhance face-framing layers
- Create volume at the crown
- Add movement and bounce
- Smooth the longer layers
- Make it look like you didn't cut it yourself (ideally)
Heatless Waves and Effortless Texture
Maybe you're not into wielding a blow dryer and round brush every day. Fair enough. The good news is the butterfly cut still looks great with less effort. Those layers are already there to add shape. Try heatless curling methods overnight – foam rollers, braids, or even robe ties. When you take them out, you'll have soft waves that really highlight the different lengths and the movement in your hair. A texturizing spray is your friend here; a few spritzes can add definition and grit, preventing it from looking too perfect and letting those layers stand out. You can also just air dry and scrunch with a little mousse for a wavier, more lived-in look. The point is, the cut does a lot of the work for you, even when you're feeling lazy.
Wrapping Up Your Butterfly Cut Attempt
So there you have it – the breakdown of tackling a butterfly cut long hair tutorial at home. It’s not brain surgery, but it’s definitely not foolproof either. You aimed for those face-framing layers and maybe got something closer to an abstract art piece, or perhaps you nailed it on the first try. Either way, you learned something, likely about your own patience and scissor-handling skills. The goal wasn't salon-level perfection necessarily, but rather adding some much-needed life and movement to long hair without booking an appointment. Hopefully, the layers settle in nicely, and you end up with something you actually like looking at in the mirror.