Table of Contents
Thinking about shaking things up with a fresh, chic bob? You're not alone! The bob haircut is a timeless classic, and while a salon visit is always a treat, sometimes you just want to grab the scissors and go for it. Cutting hair into a bob at home might seem daunting, but with the right tools, a steady hand, and a little bit of know-how, it's totally achievable. This guide is your ultimate roadmap to mastering the DIY bob. We'll walk you through everything from gathering your essential supplies to executing the perfect cut, complete with expert tips and tricks to avoid common pitfalls.
Things You Should Know Before Cutting Hair Into a Bob

Things You Should Know Before Cutting Hair Into a Bob
So, you're thinking about taking the plunge and cutting your hair into a bob? Awesome! It's a fantastic style, but before you grab those scissors, let's cover some essential ground. This isn't just about chopping off length; it's about understanding your hair type, face shape, and the kind of bob that will truly flatter you. Think of this as your pre-bob briefing – crucial intel for a successful mission!
First off, know your hair. Is it curly, straight, thick, or fine? Curly hair will bounce up more when cut, so you'll want to leave it longer than you initially think. Fine hair might benefit from a blunt cut to create the illusion of more volume. Also, consider your face shape. A bob can be tailored to complement round, oval, square, or heart-shaped faces. Do some research online – Pinterest and Instagram are your friends here – to see what styles look best on people with similar features. And lastly, be realistic about your skill level. A simple, one-length bob is much easier to achieve than an asymmetrical or heavily layered one. Start simple, and you can always get more adventurous later.
Also, think about maintenance. Short bobs often require trims every 4-6 weeks to maintain their shape. Are you prepared to commit to that, or would a longer bob that's more forgiving as it grows out be a better fit? Finally, and this is a big one: have realistic expectations. Your DIY bob might not look exactly like the picture you have in mind, and that's okay! It's all part of the learning process. The goal is to have fun, experiment with your style, and learn something new along the way.
Part 1: Gathering Supplies for Your Bob Cut
Part 1: Gathering Supplies for Your Bob Cut
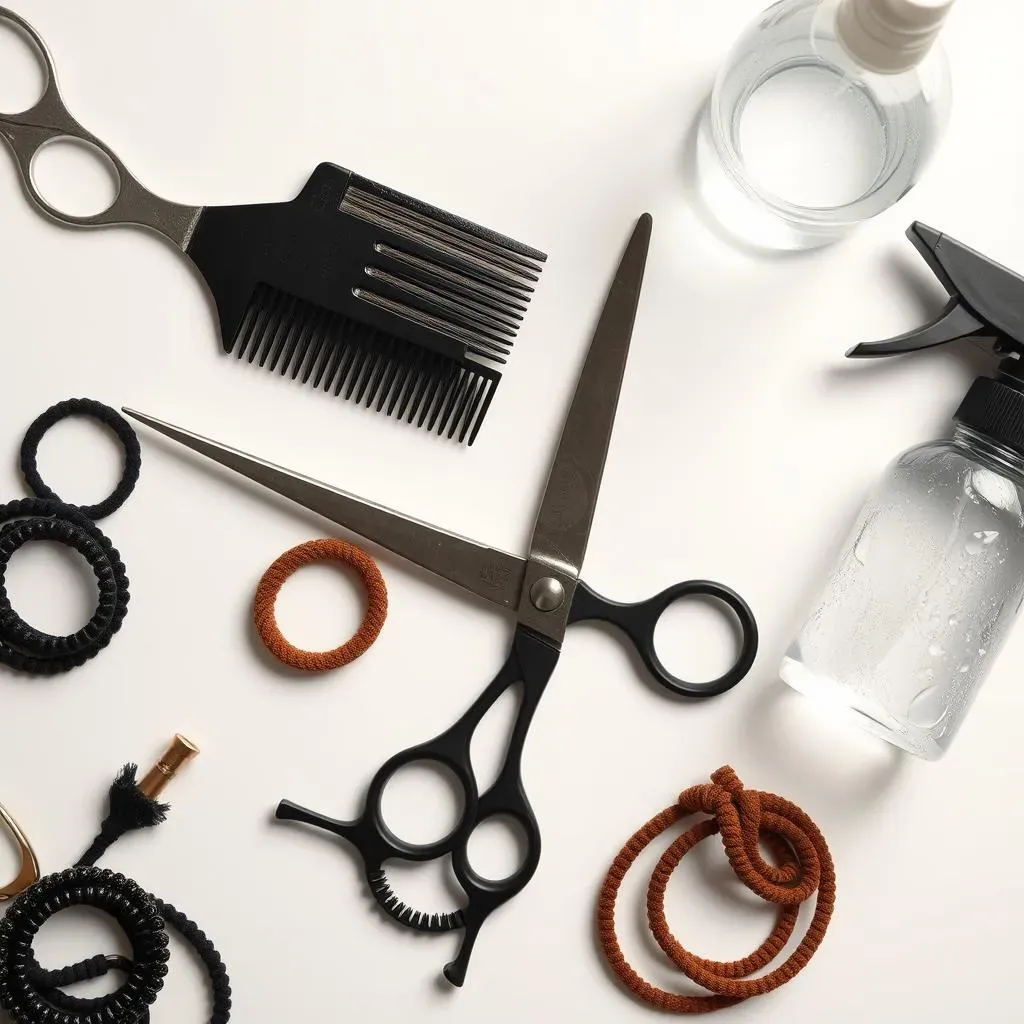
The Essential Toolkit
Alright, so you're ready to roll up your sleeves and get started? First, you need to arm yourself with the right gear. Trying to cut hair with dull kitchen scissors is a recipe for disaster (trust me, I've been there!). Investing in a few key tools will make the whole process smoother, safer, and way more likely to yield a result you're actually happy with.
At the bare minimum, you'll need a good pair of hair-cutting shears. These are different from regular scissors – they're sharper and designed to cut hair cleanly. You'll also want a comb, preferably one with fine and wide teeth, for sectioning and detangling. Hair ties are essential for keeping sections separate and out of your way. And finally, a spray bottle filled with water is helpful for keeping your hair damp, which makes it easier to cut evenly.
Beyond the Basics: Level Up Your DIY Bob
you've got the essentials, but if you want to take your DIY bob to the next level, consider adding a few more items to your arsenal. A hair razor can be great for creating texture and softening the edges of your cut. Electric clippers are useful for cleaning up the neckline or creating a more defined edge. A good quality mirror is essential, and two mirrors are even better, so you can see the back of your head. And finally, a cape or towel to protect your clothes from hair clippings will save you a lot of cleanup time.
Remember, these are just suggestions. Start with the basics and gradually add more tools as you become more comfortable with the process. The most important thing is to have the right tools for your hair type and the style of bob you're trying to achieve.
Tool | Purpose | Optional? |
|---|---|---|
Hair-cutting shears | Cutting hair cleanly | No |
Comb (fine and wide teeth) | Sectioning and detangling | No |
Hair ties | Keeping sections separate | No |
Spray bottle with water | Keeping hair damp | No |
Hair razor | Creating texture and softening edges | Yes |
Electric clippers | Cleaning up neckline | Yes |
Mirror (two if possible) | Seeing the back of your head | Yes |
Cape or towel | Protecting clothes from clippings | Yes |
Part 2: StepbyStep Guide to Cutting the Perfect Bob
Part 2: StepbyStep Guide to Cutting the Perfect Bob
Step 1: Prep and Section Your Hair
Alright, let's get down to business! Before you even think about picking up those shears, you need to prep your hair. Start with clean, dry hair. I know, some guides say to cut wet, but trust me on this one – especially if you're a beginner. Dry hair allows you to see the natural fall and texture, preventing any unwanted surprises later on. Plus, if your hair is curly or wavy, it's much easier to gauge the final length when it's dry. Once your hair is clean and dry, give it a good brush to remove any knots or tangles.
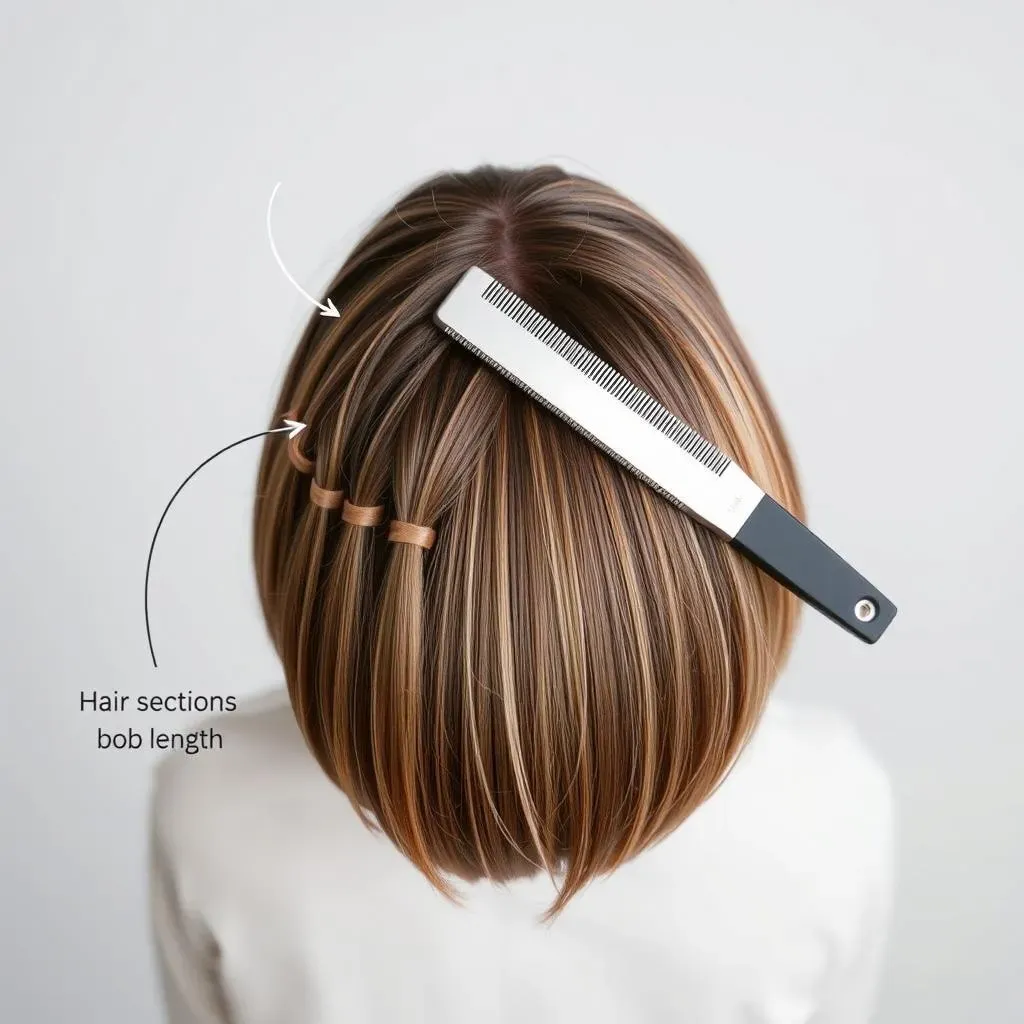
Now for the sectioning. This is crucial for ensuring an even cut. Using your comb, create a clean center part from your forehead to the nape of your neck. Then, divide your hair into two equal sections, one on each side of your head. Bring each section forward over your shoulders. Next, create a horizontal part from ear to ear, dividing each section into a top and bottom half. You should now have four sections of hair: two in the front and two in the back. Secure each section with a hair tie, placing the ties at the length you ultimately want your bob to be.
Step 2: The First Cut – Establishing the Length
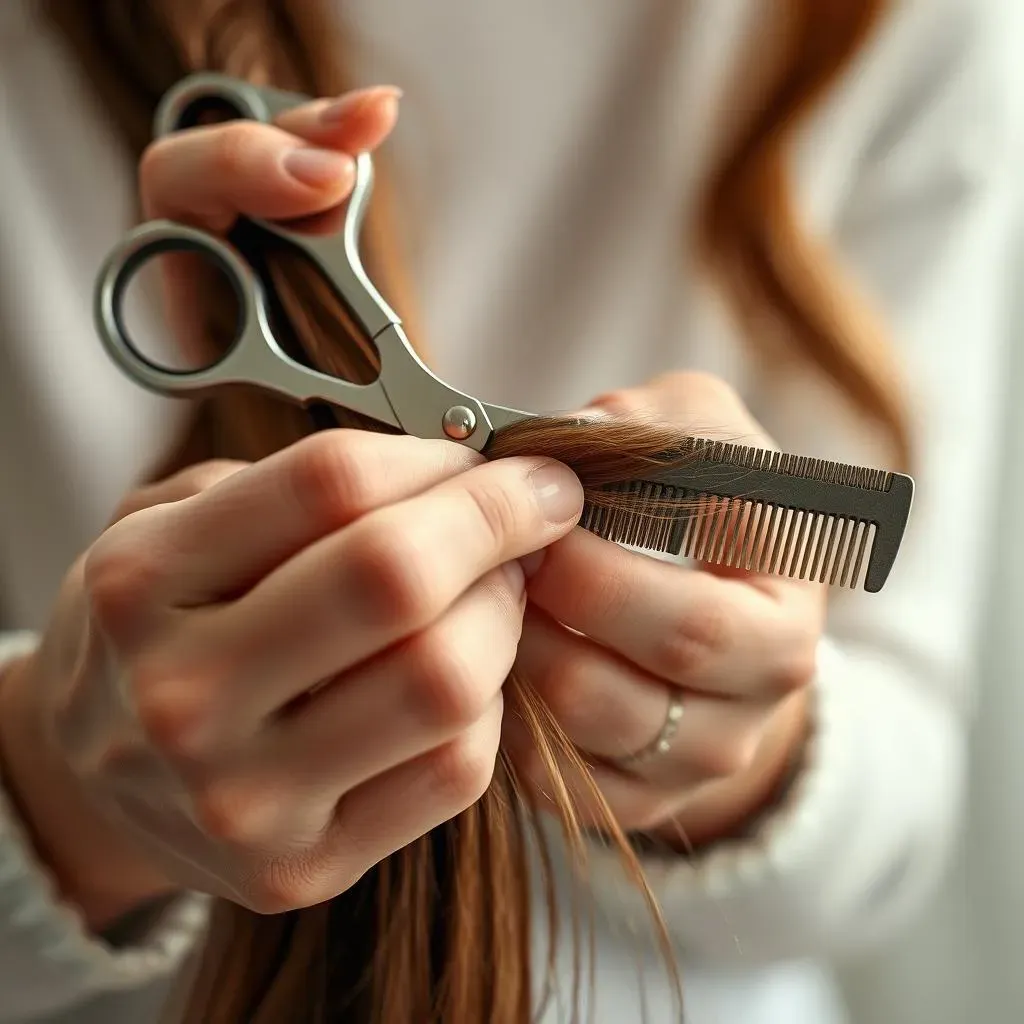
deep breaths – this is the moment of truth! Start with one of the back sections. Double-check that your hair tie is securely in place at your desired length. Now, using your sharp hair-cutting shears, carefully cut just below the hair tie, aiming for a clean, straight line. Don't rush this step! It's better to cut a little longer than you want and then trim it up later. Once you've cut one back section, repeat the process on the other back section. Now, compare the two sections to make sure they're even. If not, trim the longer side to match the shorter side.
Once the back is even, move onto the front sections. Take down one of the front sections and bring it to the back, aligning it with the back section you've already cut. Use your fingers to hold the two sections together and carefully cut the front section to match the length of the back section. Repeat on the other side. Now, take a step back and assess your work. Is everything even? Are you happy with the overall length? If not, now's the time to make any necessary adjustments.
Step 3: Refining and Adding Texture
You've got the basic bob shape down – congrats! Now it's time to refine the cut and add some texture. This is where you can really customize your bob to suit your personal style. If you want a blunt, edgy bob, you can skip this step. But if you prefer a softer, more textured look, keep reading. One of the easiest ways to add texture is with point cutting. Hold your shears vertically and snip small, random sections of hair along the bottom edge of your bob. This will soften the line and create a more piece-y look.
Another technique is to use a hair razor to create even more texture. Hold the razor at a 45-degree angle and gently glide it down the ends of your hair. Be careful not to take off too much length! You can also use thinning shears to remove some of the bulk from your hair, especially if it's thick. Just be sure to use them sparingly, as it's easy to overdo it. Remember, you can always cut more, but you can't un-cut! So, take your time, experiment with different techniques, and have fun with it.
Once I tried to give myself a layered bob and ended up looking like a stepped pyramid. It was a learning experience, to say the least! Now I stick to simple trims and leave the fancy stuff to the pros.
After refining and adding texture blow dry your hair and see the results.
Expert Q&A: Tips for a Flawless DIY Bob Haircut
Expert Q&A: Tips for a Flawless DIY Bob Haircut
So, you've taken the plunge and you're officially a DIY bobber! But maybe you're running into some snags, or just want to make sure you're doing everything right. That's where our expert Q&A comes in. We've gathered some of the most common questions and concerns about cutting a bob at home, and we're here to provide some answers and helpful tips.
One of the biggest worries is usually about unevenness. "Help! My bob is lopsided!" Don't panic! This is super common. The best way to fix it is to go back and carefully trim the longer side to match the shorter side. Use a comb to ensure you're cutting in a straight line, and don't be afraid to take it slow. Another frequent question is about dealing with layers. "How do I add layers to my bob?" Adding layers can create volume and movement, but it's also where things can get tricky. Start by sectioning off the hair you want to layer, and then use point cutting to create soft, subtle layers. If you're not comfortable with point cutting, you can also try using a hair razor to thin out the ends. And remember, less is more! You can always add more layers, but you can't take them away.
Maintaining Your Bob: Essential Tips and Tricks

Maintaining Your Bob: Essential Tips and Tricks
Regular Trims are Key
so you've got your bob, and it looks fantastic! But here's the thing about bobs – they require upkeep. To keep that sharp shape and prevent it from turning into a shapeless blob, regular trims are absolutely essential. I'm talking every 4-6 weeks, people! I know, it sounds like a lot, but trust me, it makes all the difference. Think of it like watering a plant – you wouldn't let it completely dry out, would you? Same goes for your bob. Regular trims not only maintain the shape but also get rid of any split ends, keeping your hair healthy and shiny.
If you're feeling brave, you can even try trimming it yourself! There are tons of tutorials online that show you how to do a basic trim at home. But if you're not confident, definitely leave it to the professionals. A good stylist will be able to assess your hair and give you a trim that's perfectly tailored to your bob style. Plus, they can offer advice on how to maintain your bob between trims.
The Right Products Make a Difference
Just like the right tools are essential for cutting your bob, the right products are essential for maintaining it. Depending on your hair type, you'll want to invest in a few key items. For fine hair, a volumizing shampoo and conditioner can help add body and thickness. For thick hair, a smoothing serum can help tame frizz and flyaways. And for curly hair, a curl-defining cream can help enhance your natural texture.
But no matter your hair type, there are a few products that everyone with a bob should have on hand. A heat protectant spray is a must if you use any heat styling tools, like a blow dryer or curling iron. A good hairspray can help hold your style in place, whether you're going for a sleek and polished look or a tousled and textured vibe. And a dry shampoo can be a lifesaver between washes, especially if you have oily hair. Experiment with different products to find what works best for you and your bob. And don't be afraid to ask your stylist for recommendations!
Styling Tips to Keep it Fresh
One of the best things about a bob is its versatility. You can wear it sleek and straight, tousled and textured, or even curled and wavy. The possibilities are endless! But to keep your bob looking fresh and stylish, it's important to switch up your styling routine every now and then. If you usually wear your bob straight, try adding some waves with a curling iron or wand. Or if you usually wear it down, try pulling it back into a half-updo or a low ponytail.
You can also experiment with different parts. A deep side part can add drama and sophistication, while a center part can create a more casual and effortless look. And don't forget about accessories! Headbands, scarves, and clips can all add a pop of personality to your bob. The key is to have fun and experiment with different styles until you find what you love. And remember, confidence is the best accessory of all! Rock that bob with pride, and you'll look amazing no matter what.
Tip | Description |
|---|---|
Regular Trims | Every 4-6 weeks to maintain shape and health. |
Right Products | Use volumizing, smoothing, or curl-defining products based on hair type. |
Heat Protection | Always use a heat protectant spray before styling. |
Versatile Styling | Experiment with different parts, waves, and accessories. |
Conclusion: Rock Your DIY Bob with Confidence!
So, you've taken the plunge and conquered the DIY bob! With the right prep, a dash of courage, and our trusty guide, you've unlocked a fresh, stylish look without breaking the bank. Remember, practice makes perfect. Don't be afraid to experiment with different lengths and textures as you become more confident. Embrace the freedom of at-home hair transformations and enjoy rocking your fabulous new bob! And hey, if all else fails, that's what hats (and professional stylists) are for!