Table of Contents
Thinking about chopping your hair into a stylish bob? You're not alone! The bob is a timeless cut, but salon visits can be pricey and time-consuming. What if I told you that you could master the art of "how to cut bobbed hair" right in your own bathroom? This article is your guide to achieving a fantastic bob without stepping foot in a salon. We'll start by making sure you have all the right tools, because let's be honest, dull scissors are a disaster waiting to happen. Then, I’ll walk you through a simple step-by-step method to cut your bob, even if you've never picked up a pair of shears before. Finally, we will look at some ways to style your new look, and how to keep it looking great between cuts. So, grab your courage, and maybe a friend for backup, and let's get started! By the end, you’ll have the skills to maintain your bob and save some serious cash.
Gathering Your Hair Cutting Tools

Gathering Your Hair Cutting Tools
The Essential Shears
Okay, so you're ready to take the plunge and cut your own bob? Awesome! But before you grab any old pair of kitchen scissors, let’s talk tools. First up, and probably most important, are your cutting shears. Don't skimp here; investing in a decent pair of hairdressing scissors is crucial. They’re way sharper than regular scissors, which means you'll get a cleaner cut and avoid those dreaded split ends. Imagine trying to slice a tomato with a butter knife – that’s what using dull scissors on your hair feels like. Trust me, your hair will thank you.
You'll want to look for shears that are specifically designed for hair cutting. They usually have a finger rest and a comfortable grip, which helps with control and precision. I remember the first time I tried using regular scissors—it was a total disaster! My bob looked like a jagged mountain range instead of a chic, sleek cut. So, do yourself a favor and get the right tools; it’s a small investment for a much better outcome.
Tool | Purpose | Why It's Important |
|---|---|---|
Hairdressing Shears | Cutting hair | Sharp, precise cuts; prevents split ends |
Thinning Shears | Texturizing and removing bulk | Creates a softer, more natural look |
Hair Clippers (optional) | Trimming the nape | For a cleaner, shorter back |
Hair Razor (optional) | Shaping and trimming | For textured ends |
Clips and Hair Ties | Sectioning hair | Keeps hair out of the way |
Comb | Parting and sectioning | For even, accurate cuts |
Optional But Helpful Tools
Next up, let's chat about the "nice-to-haves." Thinning shears can be your best friend if you have thick hair or want to add some texture. These scissors have teeth that remove some of the bulk, making your bob look less blocky and more natural. Think of them as the secret weapon for a stylish, effortless bob. You might also want to consider a hair razor, especially if you're aiming for a more textured, edgy look. A razor can create softer, feathered edges, giving your bob movement and dimension. But be careful; razors take some getting used to, so practice on a small section first before going all in.
And don’t forget the basics! You'll need clips or hair ties to section your hair, and a comb for parting and making sure your sections are even. Having all your tools laid out and ready to go will make the whole process smoother and less stressful. I once tried to cut my hair without sectioning it properly, and let’s just say it was a hot mess. Organization is key, my friend. So, before you even think about picking up those shears, make sure you’ve got your arsenal ready. It makes a world of difference!
Cutting Your Bob: StepbyStep
Cutting Your Bob: StepbyStep
Sectioning Your Hair Like a Pro
Alright, now that we've got our tools ready, let's talk about sectioning your hair. This is where the magic happens, or, you know, where things can go very wrong if you're not careful. First, you'll want to divide your hair into three main sections: one in the back and one on each side of your head. Think of it like creating a mohawk, but instead of shaving the sides, we're just moving the hair out of the way. Use your comb to make clean, straight parts, and secure each section with a hair tie or clip. This keeps everything neat and tidy, and it prevents you from accidentally cutting hair that you didn't intend to.
I like to start by parting my hair down the middle, then making a horizontal part from ear to ear. This creates a back section and two front sections. Make sure your sections are even; this is super important for getting a balanced bob. If you’re anything like me, you might need to double-check that everything is symmetrical. I've had some lopsided haircuts in my day, and trust me, it's not a good look. So, take your time, be precise, and your future self will thank you.
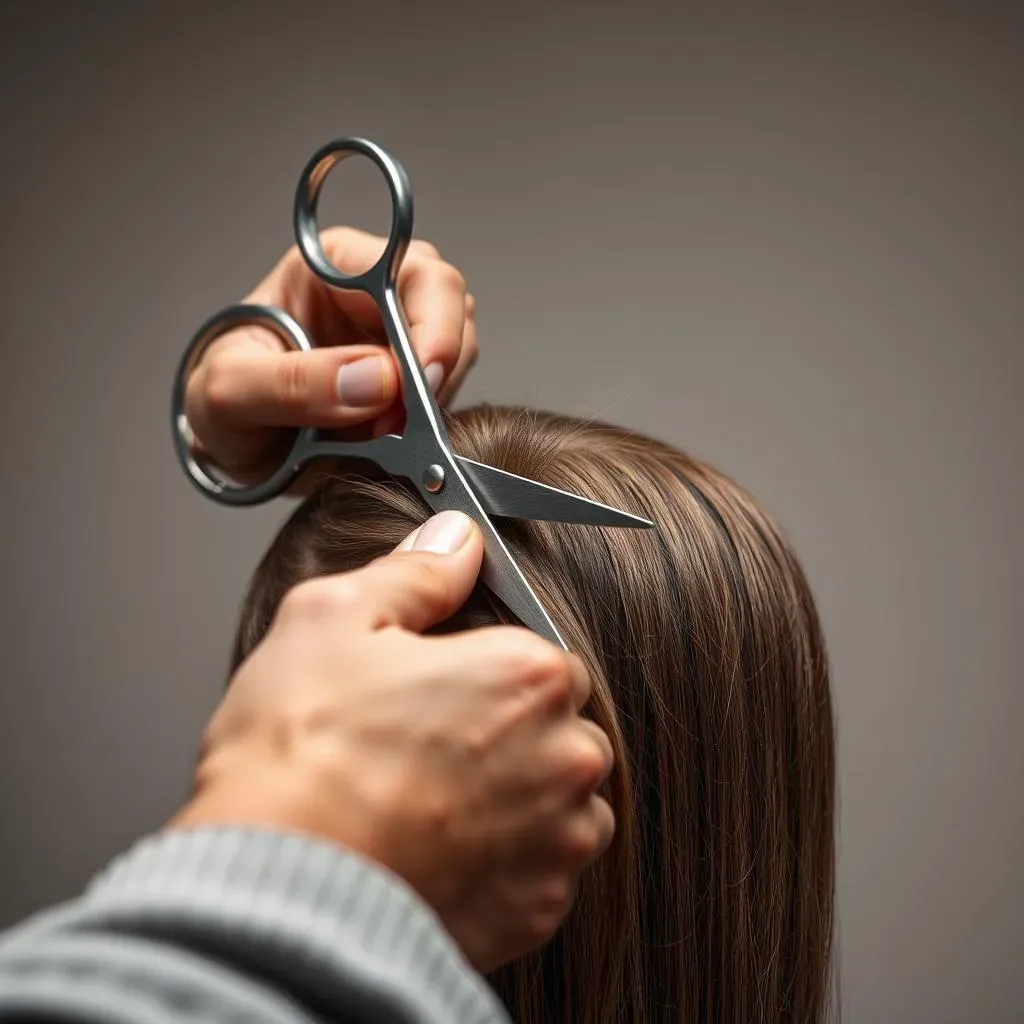
Making the First Cut
Okay, deep breaths, it's time for the first cut. Start with the back section, and decide how short you want your bob to be. Remember, it’s easier to cut more off later than to magically grow it back. So, it is better to start a little longer than you think you want it. Once you've decided on the length, hold your scissors horizontally and make a clean cut across the bottom of the back section. Don't saw back and forth, a nice, even cut. If you’re using clippers, carefully trim the nape area for a super clean look. I like to use my fingers as a guide, holding the hair between my fingers and cutting just below them. This helps me keep the cut straight and even.
Now, this is where it gets a little nerve-wracking. I remember the first time I did this, I was so nervous my hands were shaking! But hey, it's just hair, and it grows back, right? After you've cut the back section, release the side sections, and repeat the process. Use the back section as a guide to match the length on the sides. Make sure to double check that both sides are even by comparing them in the mirror. This is where those clips and hair ties come in handy, keeping the sections separated and making it much easier to cut evenly.
Step | Action | Tip |
|---|---|---|
1 | Section hair into three parts | Use clips to keep sections separate |
2 | Cut the back section | Start longer than you think you want it |
3 | Cut the side sections | Use the back section as a guide for length |
Shaping and Blending
Alright, so you've made the big cuts, but now it's time to refine your bob. This is where thinning shears and a hair razor can really help. If your bob looks too blocky or thick, use thinning shears to remove some of the bulk. Just snip small sections at the ends, and don't go overboard. Remember, less is more here. If you’re using a razor, gently glide it down the ends of your hair at an angle to create a softer, more feathered look. This will add some movement and dimension to your bob.
Blending the edges is super important for a polished look. Make sure the side sections blend seamlessly into the back section, and that the ends aren't too blunt. You can do this by making small, angled cuts with your scissors, or by using the razor to soften the edges. I like to take a step back from the mirror and see if there are any areas that look uneven or bulky. It's all about making sure your bob flows nicely and doesn't look like you just chopped it off with a butter knife. So, take your time, be patient, and trust your instincts. You've got this!
Styling and Maintaining Your Bobbed Hair Cut

Styling and Maintaining Your Bobbed Hair Cut
Okay, so you've got your bob, it's looking sharp, and you're feeling pretty darn good about yourself. But the journey doesn't end with the cut, does it? Now, it's time to talk styling and maintenance, because let's be honest, a great haircut can quickly go south if you don't know how to work with it. The good news is that bobbed hair is pretty versatile; you can go sleek and polished, or messy and textured, depending on your mood. I love how a bob can be both sophisticated and playful. It's like the chameleon of haircuts.
For everyday styling, I like to use a good quality styling cream or mousse to add some hold and definition. If you want to go sleek, use a flat iron to straighten and smooth out any frizz. And if you're like me and love a bit of texture, try using a sea salt spray or a texturizing paste to add some grit and movement. And don't forget the power of a good blow dryer! Using a round brush, you can create volume and bounce, or use a diffuser for a more natural, wavy look. Trust me, mastering a few styling techniques will make your bob look like you just stepped out of a salon every day. I know, it sounds like a lot of work, but once you get the hang of it, it becomes second nature. I remember struggling with my bob at first, it was always either too flat or too poofy, but with a bit of practice, I finally got the hang of it.
Styling Method | Tools Needed | Best For |
|---|---|---|
Sleek and Straight | Flat iron, smoothing cream | Formal events, polished look |
Textured and Messy | Sea salt spray, texturizing paste | Casual days, effortless vibe |
Voluminous and Bouncy | Round brush, blow dryer, mousse | Adding volume, special occasions |
Now, let's talk maintenance, because even the best haircuts need a little TLC to keep them looking their best. A bob, especially a shorter one, grows out pretty quickly, so you need to be prepared for regular trims to keep the shape. Depending on how fast your hair grows, you might need a trim every 4-8 weeks. I know it sounds annoying, but think of it as a regular maintenance routine, like changing the oil in your car. If you're comfortable with it, you can even trim your bob yourself at home, using the techniques we talked about earlier. But if you're not feeling confident, it's always best to visit a professional. It's a small price to pay for keeping your bob looking amazing.
Another important part of maintenance is keeping your hair healthy. Use a good quality shampoo and conditioner, and don't forget to use a deep conditioner or hair mask every once in a while, this will help keep your bob looking healthy and shiny. Avoid using too much heat on your hair, and use a heat protectant spray if you are using hot tools. And finally, don't be afraid to experiment with different styles, because a bob is a versatile cut, and you can have a lot of fun with it! I've tried everything from sleek and straight to messy and wavy, and I'm still discovering new ways to style my bob. So go ahead, play around, and find what works best for you. It's all part of the fun!
Wrapping Up Your DIY Bob
So, there you have it – your guide to mastering "how to cut bobbed hair" at home! It might seem a bit daunting at first, but with the right tools and a little patience, you can totally rock a fresh bob. Remember, practice makes perfect, and don't be afraid to experiment to find the look that's perfect for you. Whether you're rocking a sleek, chin-length bob or a textured lob, the power to maintain your style is now in your hands. And hey, if you mess up, hair grows back! Now go forth and create some amazing hair magic, you've got this!