Thinking about a fresh new look? The bob haircut is a timeless classic, chic, versatile, and surprisingly easy to achieve at home. If you're feeling brave and want to save some serious cash, learning how to cut hair bob style yourself might be the perfect solution. This guide will walk you through every step, from gathering your supplies to mastering the final touches. We'll break down the process into manageable chunks, offering tips and tricks to help you avoid common mistakes and achieve a salon-worthy finish. Whether you're aiming for a blunt bob, an A-line bob, or something in between, we've got you covered. So, grab your scissors, a comb, and a mirror, and let's get started on your DIY bob transformation! We'll explore the essential tools, provide a detailed step-by-step cutting process, share pro styling tips, and guide you on maintaining your fabulous new bob. Get ready to unleash your inner stylist and rock a stunning bob haircut, all from the comfort of your own home!
Gathering Your Supplies: What You Need to Cut a Bob
Gathering Your Supplies: What You Need to Cut a Bob
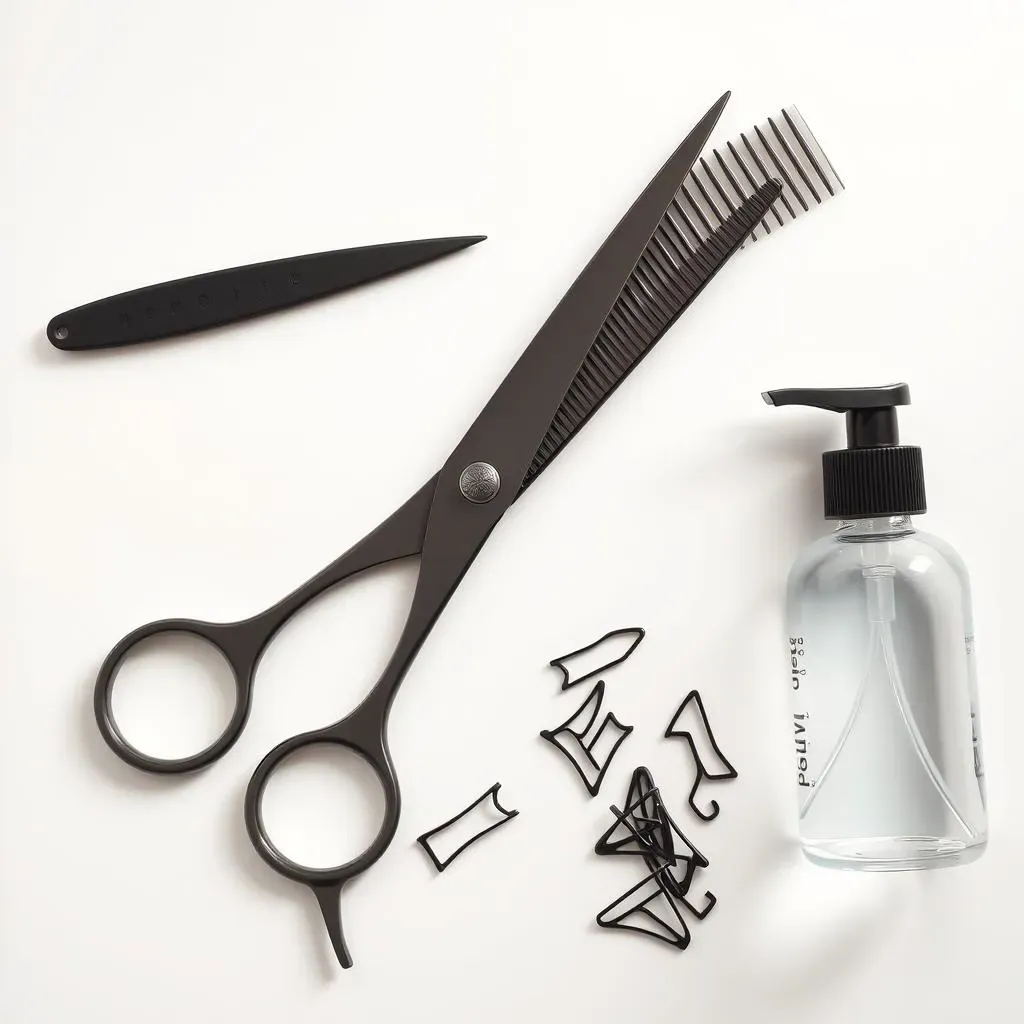
The Essential Toolkit for a DIY Bob
Alright, future bob enthusiasts, before you even think about picking up those scissors, let's talk tools. Having the right equipment is half the battle when it comes to achieving a professional-looking haircut at home. Don't skimp on quality here – investing in decent tools will not only make the process easier but will also give you much better results. Think of it like this: you wouldn't try to paint a masterpiece with dollar-store brushes, would you?
First up, you'll need a pair of sharp, high-quality hair-cutting shears. Kitchen scissors are a big no-no! Look for shears specifically designed for cutting hair; they'll give you clean, precise cuts without damaging your strands. Next, a good comb is crucial. A fine-tooth comb is perfect for creating clean sections and ensuring even cuts. You'll also want a spray bottle filled with water to keep your hair damp throughout the process. Trust me, dry hair is much harder to manage and cut evenly.
Tool | Why You Need It | Recommendation |
|---|---|---|
Hair Cutting Shears | For clean, precise cuts | Invest in a good quality pair |
Fine-Tooth Comb | For sectioning and even cuts | A must-have for accuracy |
Spray Bottle | To keep hair damp | Makes hair easier to manage |
Beyond the Basics: Nice-to-Haves for a Pro Finish
so you've got the essentials covered. Now, let's talk about some extras that can really elevate your DIY bob game. A good set of hair clips is invaluable for keeping sections of hair out of the way while you work. Trust me, you don't want rogue strands messing up your perfectly planned cut. A cape or towel to protect your clothes is also a must – unless you enjoy spending the rest of the day picking tiny hairs off your outfit.
If you're feeling fancy, you can also invest in a thinning shears. These are great for adding texture and removing bulk from thicker hair, but they can also be a bit tricky to use, so proceed with caution. Finally, having a hand mirror can be super helpful for checking the back of your head and ensuring everything is even. Cutting your own hair definitely requires some strategic maneuvering!
StepbyStep Guide: How to Cut Hair Bob Style at Home
StepbyStep Guide: How to Cut Hair Bob Style at Home
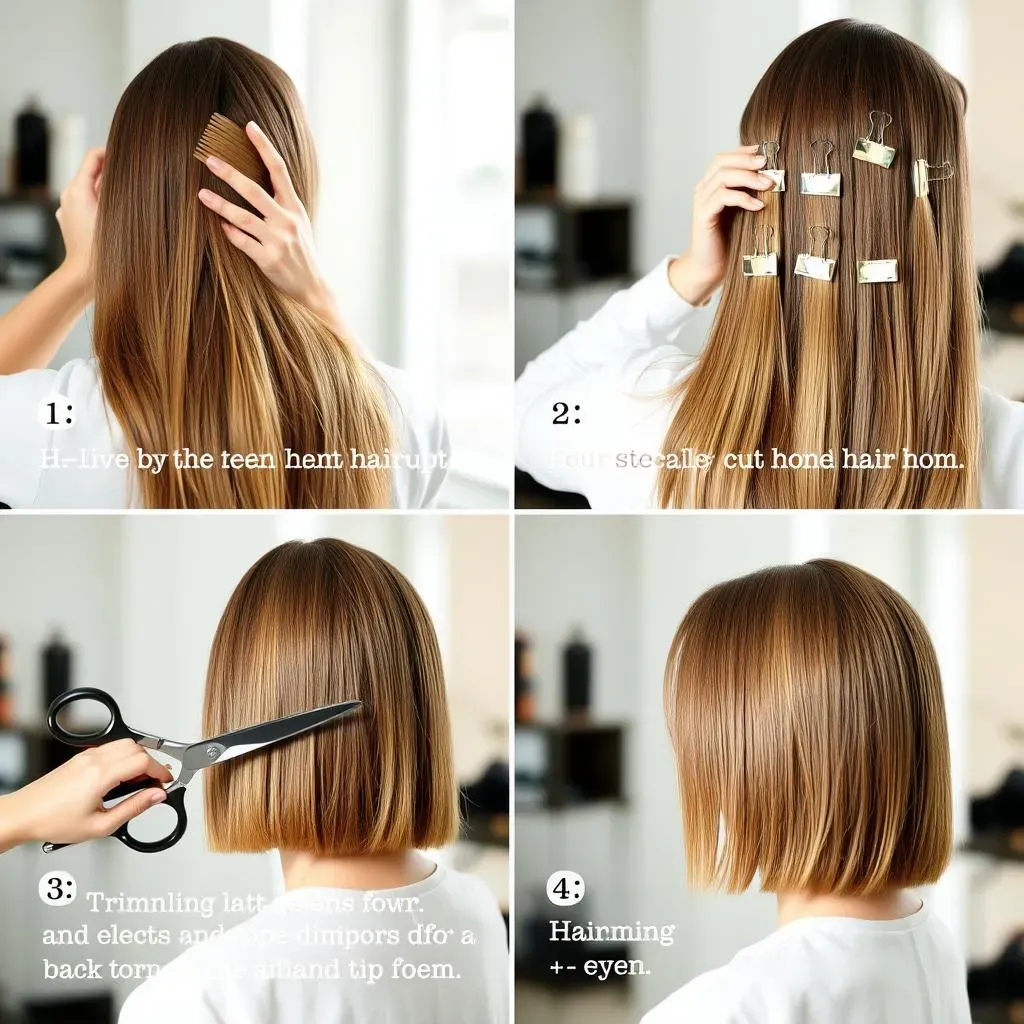
Prep Work: Getting Ready for the Cut
so you've got your tools, now it's time to prep your hair. Start with clean, damp hair. Freshly washed hair is easier to work with, and damp hair allows for more precise cuts. Comb through your hair thoroughly to remove any knots or tangles. This will ensure a smooth, even cut. Next, decide on your desired bob length. A good rule of thumb is to start longer than you think you want it – you can always cut more off, but you can't add it back! Use a hair tie to mark your desired length, or if you're feeling confident, just eyeball it. Remember, it's better to err on the side of caution.
Now, for the sectioning. This is crucial for achieving an even bob. Divide your hair into four sections: two in the front and two in the back. Use your comb to create clean, straight partings. Secure each section with a hair clip. This will keep the sections separate and prevent you from accidentally cutting hair you shouldn't be. Take your time with this step – the more precise your sectioning, the more even your final result will be.
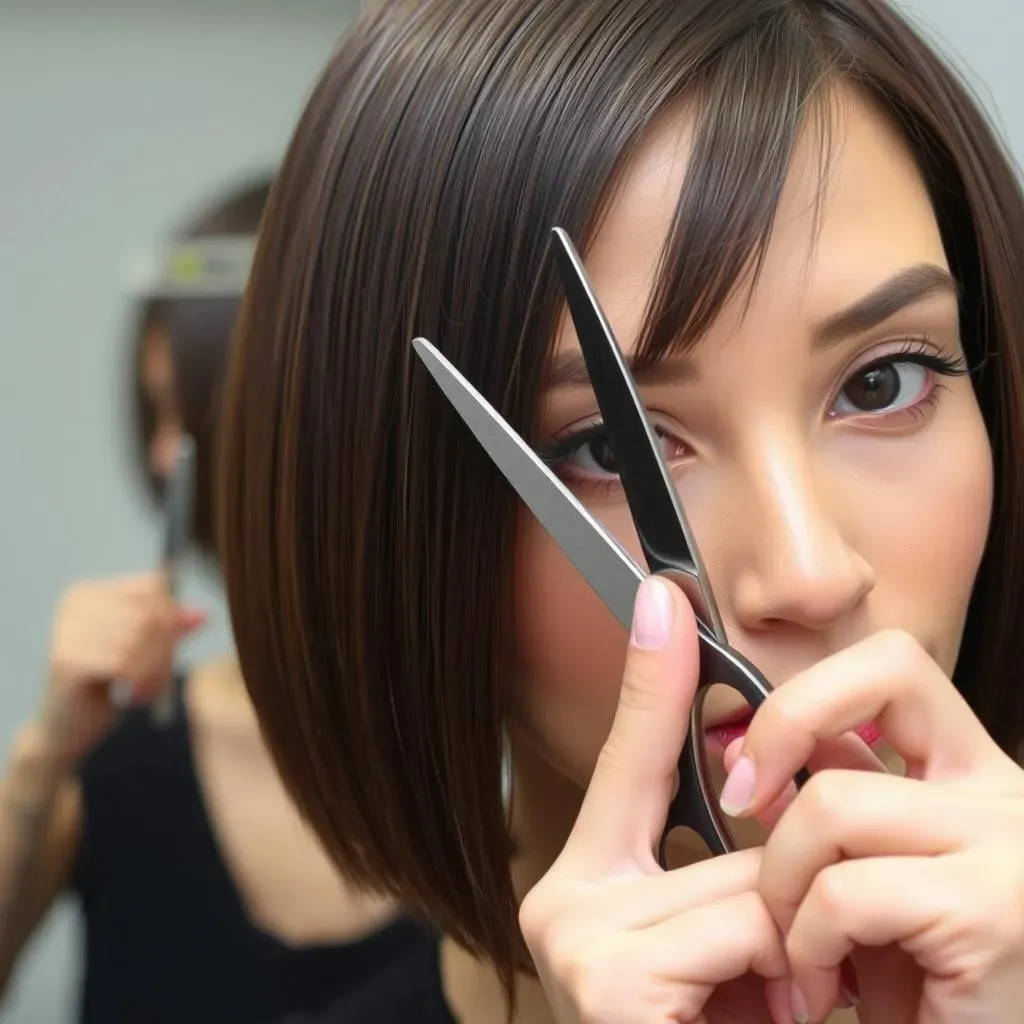
The Big Chop: Cutting Your Bob
Alright, deep breaths, it's time for the main event! Start with the back sections. Take one section at a time, and using your comb as a guide, carefully cut your hair to the desired length. Use small, controlled snips rather than one big chop. This will give you more control and prevent any accidental unevenness. Once you've cut the first section, use it as a guide for the second back section. Make sure they're the same length. Precision is key here!
Now, for the front sections. Release one front section and comb it through. Decide how you want the front to frame your face. Do you want it to be the same length as the back, or slightly longer? Once you've decided, use the back sections as a guide and carefully cut the front section to the desired length. Repeat on the other side. Remember to take your time and use small, controlled snips. After you've cut all four sections, double-check your work. Comb through your hair and look for any unevenness. If you spot any, carefully trim the longer sections to match the shorter ones.
Step | Description | Tip |
|---|---|---|
1. Prep Hair | Wash, dampen, and comb through hair | Damp hair is easier to cut evenly |
2. Section Hair | Divide hair into four sections | Clean partings are essential |
3. Cut Back Sections | Cut to desired length using small snips | Use one section as a guide for the other |
4. Cut Front Sections | Cut to desired length, framing the face | Double-check for evenness |
Pro Tips for a Perfect Bob: Achieving a SalonQuality Cut
Pro Tips for a Perfect Bob: Achieving a SalonQuality Cut
Addressing Common Bob Cutting Challenges
So, you've taken the plunge and cut your bob, but it's not quite giving "salon-fresh" vibes? Don't panic! Achieving a perfect bob at home often comes down to tackling a few common challenges. One of the biggest hurdles is unevenness. It's easy for sections to end up slightly different lengths, especially when you're working with the back of your head. Another challenge is dealing with different hair textures. Fine hair might require a different approach than thick, coarse hair. And let's not forget about those pesky cowlicks that can throw off your entire cut!
But fear not, with a few pro tips and tricks, you can overcome these challenges and achieve a bob that looks like it was cut by a professional. We're talking about techniques to ensure evenness, strategies for working with different hair types, and solutions for taming those unruly cowlicks. It's all about understanding your hair, mastering the right techniques, and having the confidence to make those final tweaks that will take your bob from "meh" to "magnificent."
Techniques for Ensuring an Even Cut
Alright, let's dive into the nitty-gritty of achieving an even bob. One of the most effective techniques is the "point cutting" method. Instead of cutting straight across, hold your scissors at a slight angle and make small, choppy cuts. This creates a softer, more textured line that's less likely to show any imperfections. Another great tip is to use a level as a guide. Yes, you read that right! A small spirit level can help you ensure that your hair is even all the way around. Simply hold the level against your hair and trim any sections that are sticking out.
Also, remember to constantly check your work in the mirror. Step back and take a look at your hair from different angles. This will help you spot any unevenness that you might have missed up close. And don't be afraid to ask for help! If you have a friend or family member who's willing to lend a hand, have them check the back of your head for you. A fresh pair of eyes can make all the difference. Cutting your own hair is definitely a challenge, but with the right techniques and a little bit of patience, you can achieve a salon-worthy result.
Technique | Description | Benefits |
|---|---|---|
Point Cutting | Small, choppy cuts at an angle | Creates a softer, more textured line |
Using a Level | Hold a spirit level against your hair | Ensures evenness all the way around |
Constant Mirror Checks | Step back and view from different angles | Helps spot any unevenness |
Maintaining Your Bob: Keeping Your Haircut Fresh and Stylish

Maintaining Your Bob: Keeping Your Haircut Fresh and Stylish
Regular Trims: The Key to Bob Longevity
Alright, so you've got your perfect bob – now what? The secret to maintaining your bob and keeping it looking fresh is regular trims. Think of it like this: your bob is a high-maintenance plant that needs regular pruning to thrive. How often you need a trim depends on your hair growth rate and the style of your bob, but generally, every 6-8 weeks is a good rule of thumb. If you're rocking a blunt bob, you might need trims more frequently to keep that sharp, clean line. For more textured or layered bobs, you can probably stretch it out a bit longer.
But here's the thing: those regular trims don't necessarily mean a trip back to the salon! If you're feeling confident, you can absolutely maintain your bob at home with a few simple techniques. We're talking about learning how to dust your ends, trim those pesky flyaways, and keep your bob looking its best between full-on haircuts. It's all about staying on top of things and preventing your bob from losing its shape and style.
Styling Secrets: Enhancing Your Bob's Natural Beauty
let's talk styling! One of the best things about a bob is its versatility. You can wear it sleek and straight, tousled and textured, or anything in between. The key to styling your bob is to embrace its natural texture and use products that enhance, not mask, its beauty. If you have fine hair, try a volumizing mousse or spray to add some lift and body. For thicker hair, a smoothing serum or oil can help tame frizz and add shine. And don't forget about heat protectant! If you're using hot tools like straighteners or curling irons, always protect your hair from damage.
Experiment with different styling techniques to find what works best for your hair type and bob style. A round brush can help you create soft, bouncy waves, while a flat iron can give you a sleek, polished look. And don't be afraid to get creative with accessories! Headbands, scarves, and clips can add a touch of personality to your bob and keep it looking fresh and fun. Remember, styling is all about expressing your individuality and making your bob your own.
Product | Purpose | How to Use |
|---|---|---|
Volumizing Mousse | Adds lift and body to fine hair | Apply to damp hair before styling |
Smoothing Serum | Tames frizz and adds shine to thick hair | Apply to damp or dry hair |
Heat Protectant | Protects hair from heat damage | Apply before using hot tools |
Product Picks: Must-Haves for a Bob Haircut
Now, which products do you *really* need to keep that bob looking its best? It boils down to a few key players. A good texturizing spray is a game-changer, especially if you're after that effortless, beachy vibe. It adds grip and definition without making your hair feel stiff or sticky. Dry shampoo is another must-have, especially for those of us who are prone to oily roots. It refreshes your hair between washes and adds volume at the same time. Talk about a win-win!
And let's not forget about a high-quality hairspray. Whether you prefer a light-hold mist or a firm-hold lacquer, hairspray is essential for keeping your bob in place and preventing flyaways. Look for a hairspray that's designed for your hair type and styling needs. With the right products in your arsenal, you can keep your bob looking fresh, stylish, and absolutely fabulous, day in and day out.
Rock Your DIY Bob: Final Thoughts and Encouragement
So, you've taken the plunge and learned how to cut hair bob style yourself! Give yourself a pat on the back – you've saved money and gained a new skill. Remember, practice makes perfect. Don't be discouraged if your first attempt isn't flawless. Keep experimenting, refining your technique, and most importantly, have fun with it! A bob is a versatile style that can be adapted to suit any face shape and hair texture. With a little practice, you'll be rocking a salon-worthy bob in no time. And who knows, you might even become the go-to stylist for your friends and family!