Table of Contents
Thinking about a stylish long bob, but dreading the salon prices? You're not alone! Plenty of people want that chic, effortless look without the hefty bill. This guide is your answer to "how to cut hair into long bob" at home, like a pro, no fancy salon needed. We're diving into the nitty-gritty of DIY haircuts, from gathering the right tools to mastering the cutting techniques. Forget those scary salon visits, because you are about to learn how to achieve a perfect long bob in your own bathroom. I'll walk you through each step, making sure you feel confident and ready to transform your look. From prepping your hair to the final snip, get ready to discover how simple it can be to get a fantastic long bob. Let's get started and turn your hair dreams into reality!
Gathering Your Haircutting Arsenal
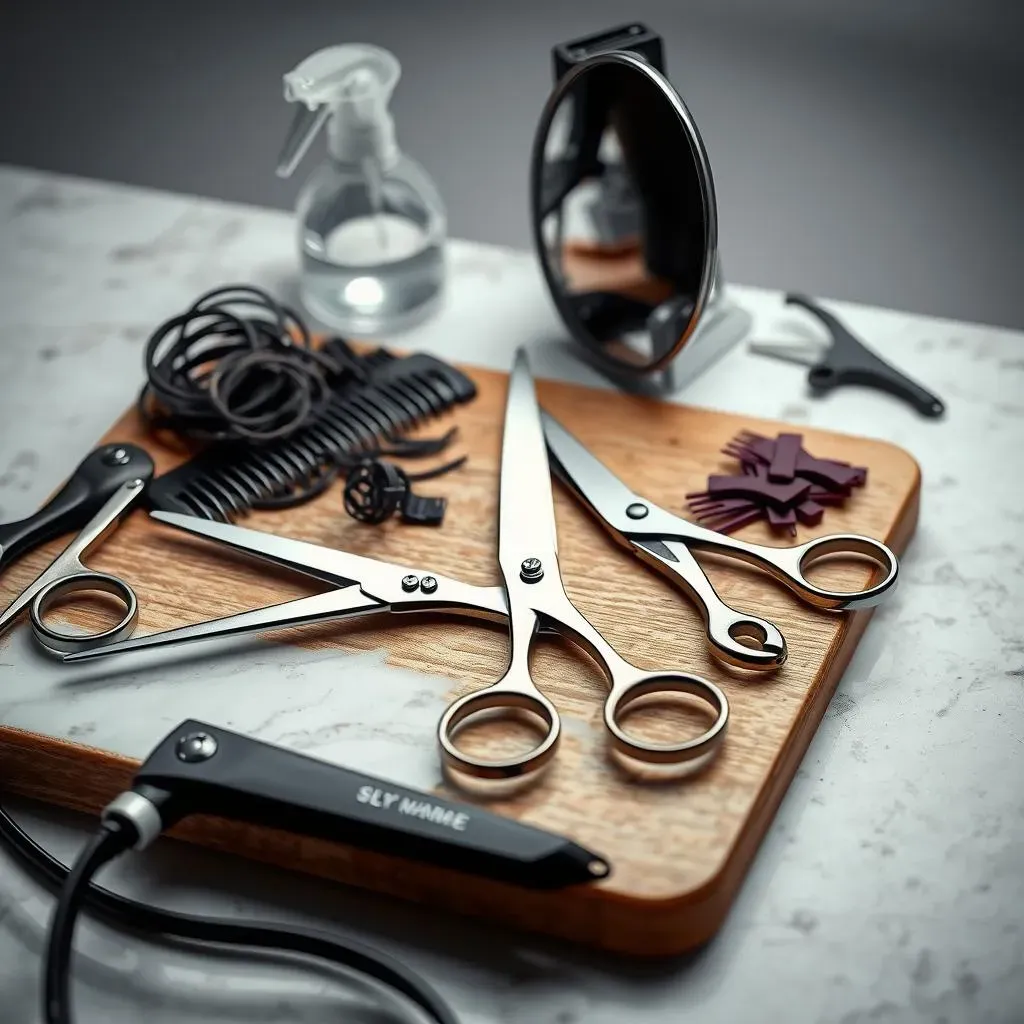
Gathering Your Haircutting Arsenal
The Essential Tools
Alright, before we even think about picking up those scissors, let's talk tools. You wouldn't build a house without the right gear, and you shouldn't cut your hair without it either. First things first, you need a good pair of haircutting shears. Don't even think about using kitchen scissors, trust me on this one. They're dull, they’ll make a mess, and they’ll give you a headache. Invest in some quality shears; it's worth it. Next, grab a comb, preferably one with both fine and wide teeth. This will be your best friend for sectioning and getting clean lines. Hair ties or clips are also a must, you'll need them to keep sections of your hair out of the way. And if you're feeling fancy, a spray bottle with water will help keep your hair damp and easy to manage.
Now, let’s talk about some optional but highly recommended items. A hair razor, if you're feeling brave, can help blend and soften the ends of your bob. Thinning shears are also great for removing bulk if you have thick hair or want to create a textured look. Lastly, a mirror, preferably a handheld one, will help you see the back of your head. Because unless you have eyes in the back of your head, that’s going to be tricky.
Tool Checklist
Tool | Why You Need It |
|---|---|
Haircutting Shears | For clean, precise cuts. |
Comb | For sectioning and guiding cuts. |
Hair Ties/Clips | To keep hair out of the way. |
Spray Bottle | To keep hair damp. |
Hair Razor (Optional) | For blending and softening ends. |
Thinning Shears (Optional) | For removing bulk and creating texture. |
Handheld Mirror (Optional) | To see the back of your head. |
Prep Work: Setting the Stage
Before you get scissor-happy, make sure your hair is clean and dry. Wet hair stretches, and you might end up with a bob that’s way shorter than you wanted. So, wash your hair, let it air dry, or blow it dry, whatever your preference. Once it's dry, give it a good brush. This gets rid of any knots and makes sure your hair is smooth and ready to be cut. Find your natural part and comb your hair so that it’s sitting how you usually wear it. This will help you cut an even bob. And for the love of all that is holy, make sure you have good lighting. You need to see what you're doing, unless you're going for the "I cut my hair in the dark" look which is never a good look.
Cutting Your Own Long Bob, StepbyStep
Cutting Your Own Long Bob, StepbyStep
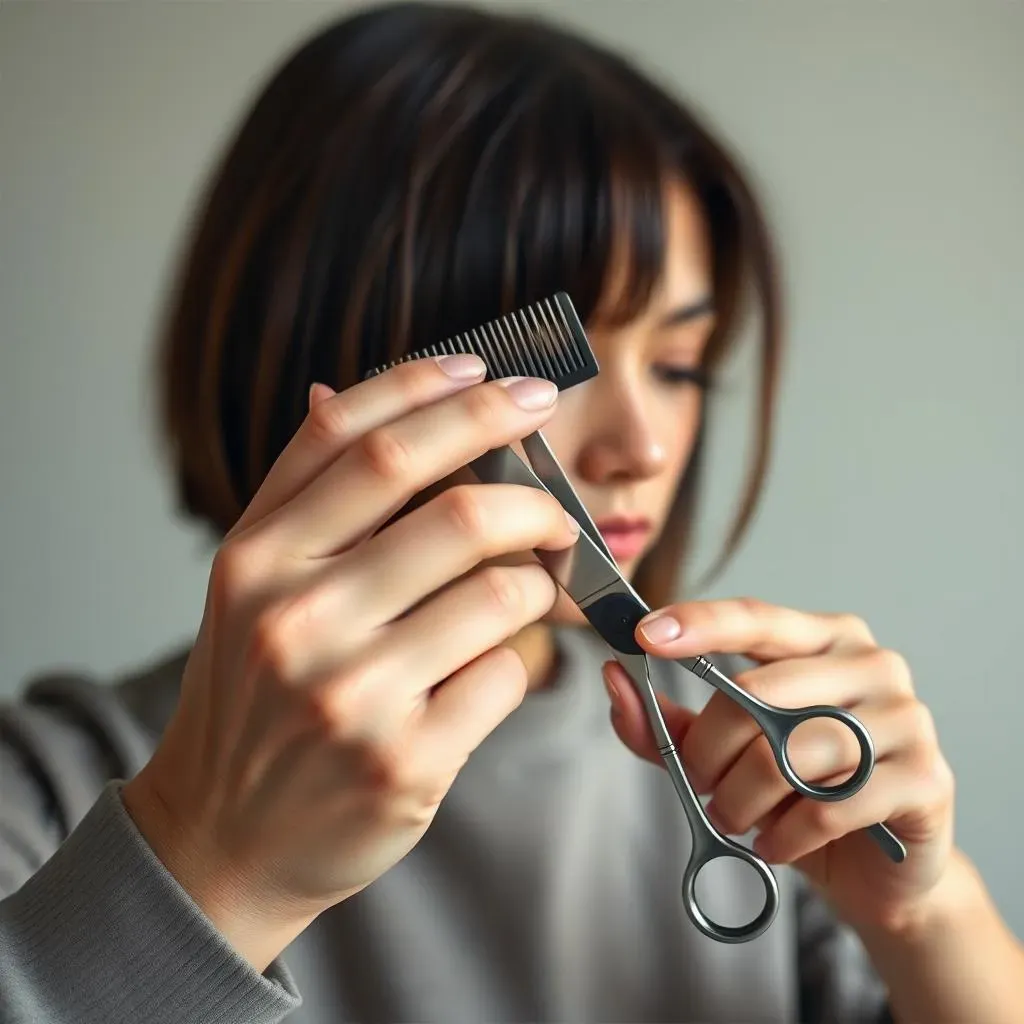
Sectioning Your Hair Like a Pro
Okay, so you've got your tools and your hair is prepped, let's get down to business. First, we're going to divide your hair into three sections. Imagine you're making a "U" shape on your head. Start by creating a part from ear to ear, going straight across the back of your head. This section at the back is your first section. Now, take the hair in front of your ears and separate it into two sections, one on each side of your head. Use your hair ties or clips to secure each section, so they don't get in the way. It's like building a hair fort, keeping each area separate.
Make sure each section is smooth and free of tangles, because we don't want any surprises later. This step is all about creating a clear workspace for your scissors. Think of it like setting up your canvas before you start painting. A well-sectioned head will make the cutting process way easier and less stressful. Trust me, those few extra minutes spent sectioning are worth it.
The Big Snip: Cutting the Back Section
Alright, the moment we've all been waiting for. Let's start with the back section. Take your comb and comb through the section again, making sure all the strands are aligned. Now, decide how long you want your long bob to be. Grab that back section and pull it straight down. With your haircutting shears, cut across the bottom, making a nice, straight line. Start with less, you can always cut more. Go slowly and carefully, and remember that perfection is overrated. If you are not sure, cut a little bit, then check, and keep cutting. It's better to take your time than to end up with a bob that's way shorter than you wanted. Once you have your back section at the desired length, it’s time to move to the sides.
Refining the Sides and Blending
Now for the sides. Release one side section, and comb through it again. You can cut this section in a similar fashion, matching the length of the back section. Take your time, and remember to be patient. Once both sides are the same length, you can start blending the ends. This is where a hair razor comes in handy. Take small pieces of hair and run the razor down the ends of the hair at an angle. This will soften the ends of your bob and make it look more polished. If you don't have a hair razor, you can also use your haircutting shears to point cut the ends, just snip into the ends at an angle. This will create some texture and help blend everything together.
Step | Action |
|---|---|
1 | Divide hair into three sections. |
2 | Cut the back section to the desired length. |
3 | Cut the side sections matching the back. |
4 | Blend the ends using a razor or point cutting. |
Styling and Maintaining Your Long Bob

Styling and Maintaining Your Long Bob
So, you've got your fresh long bob, congrats! Now, let's talk about keeping it looking fabulous. Styling a long bob is super versatile, which is why it's so popular. For a sleek, polished look, you can blow-dry your hair with a round brush, focusing on smoothing the ends. If you want some volume, try flipping your head upside down while blow-drying. Once dry, you can use a straightener or curling iron to create waves or curls. Don't forget to use a heat protectant spray to keep your hair healthy! For a more casual, textured look, try using a texturizing spray or sea salt spray. This will give your bob a nice, effortless vibe. You can scrunch your hair with your fingers to enhance the texture, or let it air dry for a more natural look. The key is to experiment and find what works best for you and your hair type.
Maintaining your long bob is also crucial to keep it looking sharp. Trimming your bob every 4-6 weeks will help keep the shape and prevent split ends. If you’re comfortable, you can do this yourself using the same technique we talked about earlier. If not, don’t be afraid to visit a salon for a quick trim. Regular moisturizing is also a must. Use a good quality conditioner and hair mask to keep your hair hydrated and healthy. This will prevent dryness and breakage, and keep your bob looking its best. Also, pay attention to your hair's specific needs. If your hair is fine, you might want to use volumizing products. If it’s thick, you might want to use smoothing products. It’s all about finding what works best for you.
Style | How to Achieve |
|---|---|
Sleek and Polished | Blow-dry with a round brush, straighten if needed. |
Voluminous | Blow-dry upside down, use volumizing products. |
Textured | Use texturizing spray or sea salt spray, scrunch with fingers. |
Wavy or Curly | Use a curling iron or wand, set with hairspray. |
Remember, your long bob is a canvas, and you can style it in countless ways. Don't be afraid to experiment with different looks and find what makes you feel confident and fabulous. And, most importantly, have fun with it! Hair is meant to be enjoyed, so go out there and rock your new long bob!
Wrapping Up Your DIY Long Bob Journey
So, you've made it through the steps, scissors in hand, and hopefully, you're rocking a fresh new long bob. Remember, practice makes perfect, and even if your first attempt isn't flawless, it's a learning experience. The beauty of a DIY haircut is that you're in charge. You can tweak, adjust, and refine your style as you go. Keeping your hair trimmed every few weeks will maintain the shape and keep it looking its best. You've now got the skills to keep your long bob looking sharp, whenever you want. So, go ahead, strut your stuff, and enjoy that stylish, self-made look. You did it!