Thinking about a fresh bob but dreading the salon prices? I get it. The struggle of wanting a stylish cut without breaking the bank is real. That's where the magic of DIY hair comes in. This article is your go-to guide on how to cut your own hair in bob, and trust me, it's not as scary as it sounds. We'll walk through everything, from gathering the right tools – no, kitchen scissors are a hard no! – to the actual snip-snip process. I'll break down how to section your hair, where to make the cuts, and how to blend it all together for a look that's less "oops" and more "wow." We'll even talk about the maintenance, because let's be honest, a bob needs some love to stay sharp. So, whether you're a seasoned DIY-er or a complete newbie, grab your shears and let’s get started. It's time to take control of your style and learn how to cut your own hair in bob, I promise you’ll be surprised at how easy it can be.
Gathering Your HairCutting Arsenal
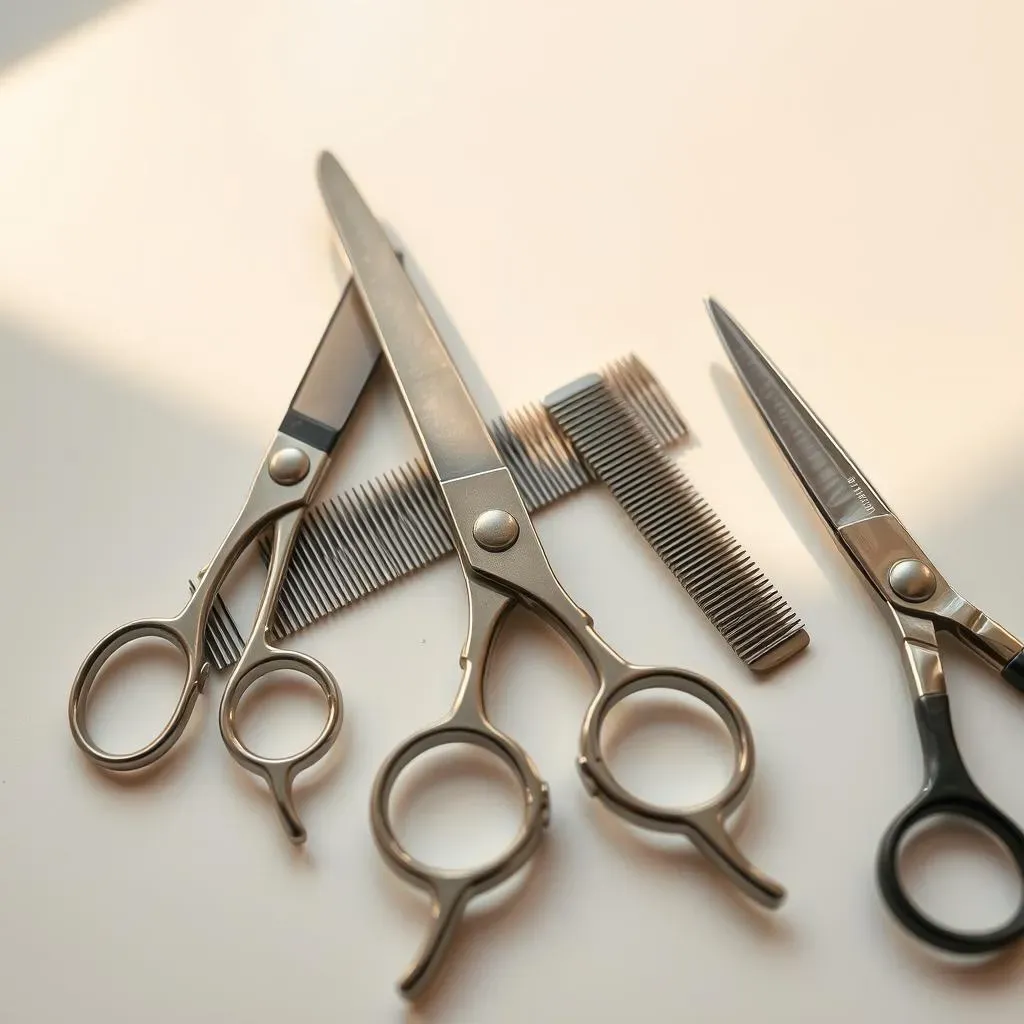
Gathering Your HairCutting Arsenal
The Essential Tools of the Trade
so you're ready to take the plunge and cut your own bob? Awesome! First things first, let's talk tools. You can't just grab any old scissors from the junk drawer; that's a recipe for a hair disaster. What you need are some legit hair-cutting shears. These are way sharper than your kitchen scissors and are designed to cut hair cleanly, which is crucial for avoiding split ends and a jagged look. Think of it like using a scalpel versus a butter knife – one is precise, the other is...well, not so much. You'll also want a comb, preferably one with fine teeth, to keep everything neat and tidy. And yes, hair clips are your friend, trust me you'll need them to keep the rest of your hair out of the way.
Now, if you're feeling a bit more adventurous, or if you have thicker hair, you might want to consider a hair razor and thinning shears. A hair razor is great for shaping the ends of your bob and giving it that soft, textured look. Thinning shears, on the other hand, are for removing bulk and adding movement to your hair. But be warned: these are tools that require a little practice to master. Don't go crazy with them on your first try. Start slow, less is more, and remember you can always cut more later, but you can't glue it back on. I'm speaking from experience, people!
Tool | Purpose | Why you need it |
|---|---|---|
Hair-cutting shears | Precisely cutting hair | Avoids split ends and jagged cuts |
Comb | Sectioning and smoothing hair | Keeps hair neat and manageable |
Hair Clips | Holding hair back | Keeps hair out of the way while cutting |
Hair Razor | Shaping and texturizing ends | Creates soft, textured look |
Thinning Shears | Removing bulk and adding movement | Adds texture and reduces volume |
Optional but Useful
Finally, let's talk about a few optional but useful items. A spray bottle filled with water is handy for keeping your hair damp while you cut, which makes it easier to manage. A mirror is essential so that you can see the back of your head. You might need a second mirror to help you with that, or maybe you're a contortionist, I don't know. And a cape or old towel to cover your shoulders is a must for catching all those tiny hair pieces. You'll be finding them for days if you don't, trust me. Think of these as your support crew for a successful haircut. Now you're all geared up, let's move to the actual cutting!
Cutting a Bob: StepbyStep
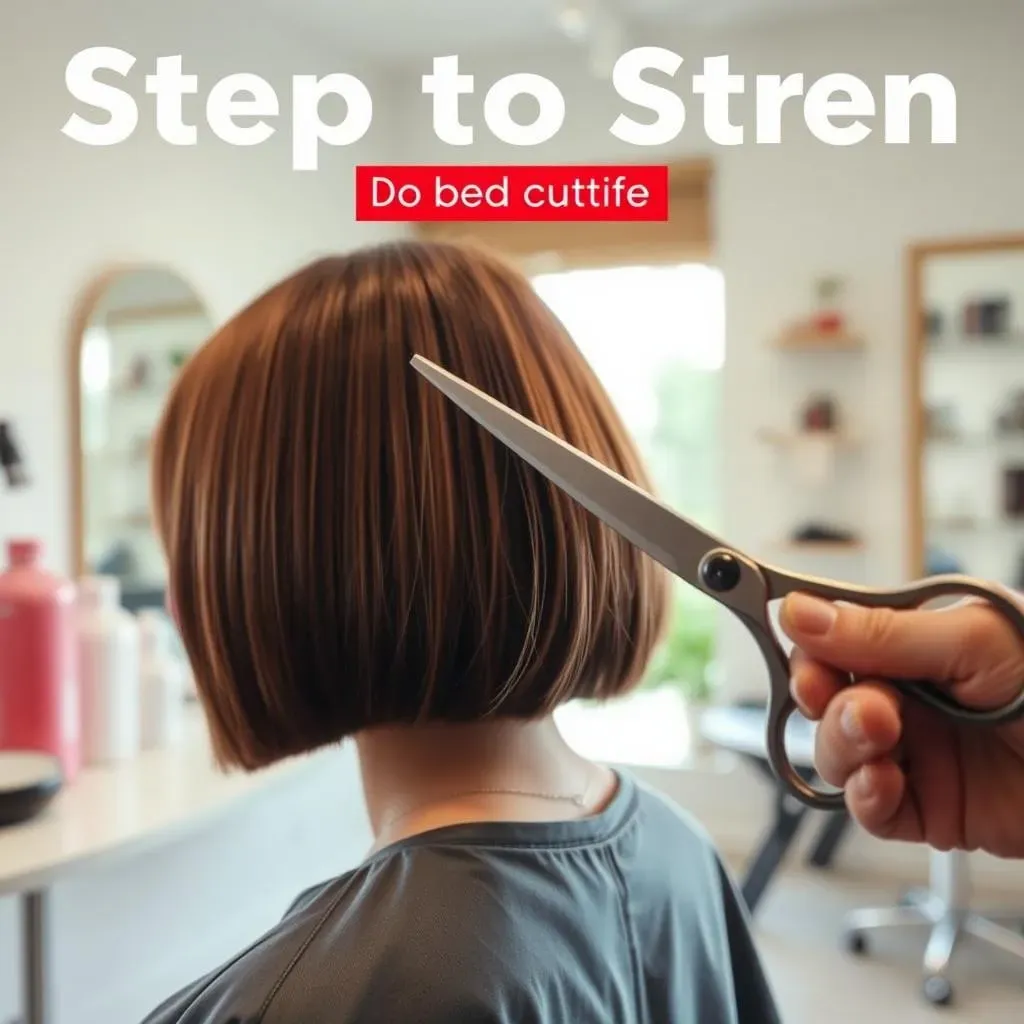
Cutting a Bob: StepbyStep
so you’ve got your tools, you're feeling brave, and it's time for the main event: actually cutting your hair into a bob. First off, let's get organized. Start by washing your hair – it's easier to cut when it’s clean and damp. No need to go crazy with the shampoo, just get it wet. Now, find your natural part. It’s where your hair naturally falls, and it’s important for a balanced cut. Once you know where that is, comb your hair all the way back, and then push it forward lightly with your fingers. You should see where your hair wants to split, that's your part. Next, divide your hair into three sections: one at the back and two on either side of your head. Use those handy clips to secure each section into a ponytail. This keeps things neat and stops you from accidentally snipping off more than you intended – which is surprisingly easy to do, by the way.
Now for the cutting! Start with the back section. Decide how short you want your bob to be. If you're going for a longer bob, pull the ponytail further down; if you want a short, sharp bob, keep it closer to your neck. Use your hair-cutting shears to make a straight cut right underneath the hair tie. Take your time here, slow and steady wins the race. You might need to cut across the top of the ponytail slowly to make sure you get an even cut, especially if you have thicker hair. Once the back is done, move on to the side sections. Using the hair razor, carefully shape the sides to match the length of the back. This is where you can really customize your bob, you can make the front longer, or keep it all one length. Remember, keep the hair damp and comb frequently to make sure you keep the shape.
Step | Action | Tip |
|---|---|---|
1 | Wash and Dampen Hair | Clean, damp hair is easier to cut |
2 | Find Natural Part | Comb all hair back, then push forward to find |
3 | Divide Hair | Three sections: back, left, right |
4 | Cut Back Section | Straight cut under the hair tie |
5 | Shape Side Sections | Use hair razor, match back length |
If you're feeling confident, you can add some layers to your bob. This can give your hair more volume and movement. To do this, use your comb to section out a small piece of hair, lift it up, and trim the ends with your cutting shears. Don't go too crazy here, start small. Remember, you can always cut more, but you can't undo it. Finally, to blend the ends and give it a professional touch, lift small pieces of hair and run the hair razor down the ends in a downward, angled motion. This will soften the lines and give your bob a more polished look. And there you have it, you've just cut your own bob! Now, step back, admire your work, and get ready for the next step, which is maintaining your lovely new bob.
Maintaining Your Bob: Tips and Tricks

Maintaining Your Bob: Tips and Tricks
so you've bravely taken the plunge and cut your own bob, and it looks amazing! But here's the thing about bobs: they require a little upkeep to stay looking sharp. It's not a set-it-and-forget-it kind of hairstyle, unfortunately. Think of it like a houseplant; it needs regular care to thrive. If you want to maintain that fresh-from-the-salon look, regular trims are essential. Depending on how quickly your hair grows, you'll probably need a trim every 4-6 weeks. Yes, I know, it sounds like a lot, but it's worth it to keep your bob looking its best. If you let it grow out too much, it’ll lose its shape and start looking a bit, well, shaggy. And nobody wants a shaggy bob, trust me.
Now, let's talk about those thinning shears we mentioned earlier. These are your secret weapon for adding texture and removing bulk. But, and this is a big but, use them wisely! Avoid using them in the middle or near the top of your hair, that's a recipe for disaster. Instead, focus on the ends, where you want to add some movement and reduce volume. Think of it as sculpting, you're not chopping, you're refining. A little goes a long way with thinning shears, so start with a small amount and check your work in the mirror frequently. You can always do more, but you can't undo what's already done. And if you're ever in doubt, just stop and take a breath. It's better to be cautious than to end up with a haircut you're not happy with.
Tip | Description |
|---|---|
Regular Trims | Every 4-6 weeks to maintain shape |
Thinning Shears | Use on ends to add texture, not near top |
Professional Help | Consider a pro for initial cut, then trim at home |
Finally, let's be real, sometimes you just need a professional. If you're not feeling confident about doing a full cut yourself, consider letting a stylist do the initial cut and then you can maintain it at home. This way you have a good base to work from, and you can just trim the ends as it grows out. It's a great middle ground between salon visits and full-on DIY. Remember, this is your hair we're talking about, and you want to feel good about it. So, if you're struggling, don't be afraid to ask for help. And if you're feeling like a total pro, go for it! Just remember to take your time, be patient, and enjoy the process. You've got this!
Wrapping Up Your DIY Bob Journey
So, there you have it! Cutting your own bob might seem like a big leap, but with the right tools and a bit of patience, it’s totally achievable. Remember, it's all about taking it slow and steady, and don't be afraid to start with a longer length if you're nervous. A bob is a fantastic style that can really change your whole look, and now you have the power to maintain it yourself. If you're feeling unsure, there's no shame in getting a professional to set the initial shape and then using these tips to keep it fresh at home. Whether you're a DIY pro or just dipping your toes in, I hope this guide has given you the confidence to grab those shears and make your bob dreams a reality. Happy cutting!