Thinking about saving some cash and skipping the barber? Learning how to cut your own hair male can feel like a daunting task, but with the right tools and a little patience, you can achieve a decent trim from the comfort of your own bathroom. This guide breaks down the process into manageable steps, whether you're wielding clippers for a buzz cut or prefer the precision of scissors for a more styled look. We'll cover everything from gathering the essential tools to mastering basic techniques, ensuring you avoid any major hair-raising disasters.
Essential Tools for Cutting Your Own Hair at Home (Male)
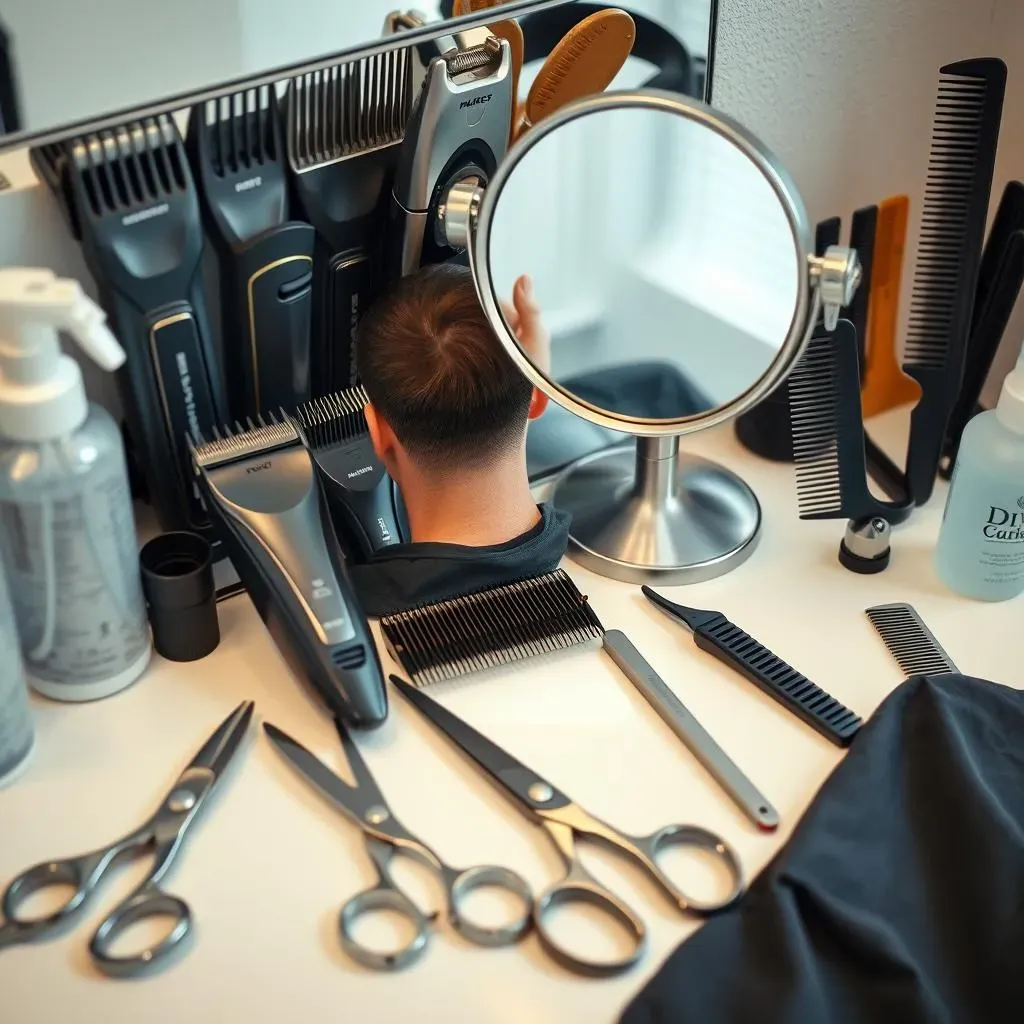
Essential Tools for Cutting Your Own Hair at Home (Male)
Clippers: Your Hair Cutting Powerhouse
Let's be real, clippers are the MVP when it comes to DIY male haircuts, especially for shorter styles. A good set of clippers will be your best friend, making quick work of back and sides. Look for a kit that includes multiple guard lengths – these determine how much hair you're taking off. Also, consider cordless clippers for maximum maneuverability. Trust me, wrestling with a cord while trying to fade your own hair is not a fun time. You’ll also want to find a set that is easy to clean and maintain.
Scissors: Precision and Style
While clippers are great for bulk removal, scissors are essential for detail work and longer styles. Invest in a pair of quality hair-cutting shears – kitchen scissors just won't cut it (pun intended!). Look for stainless steel shears with a comfortable grip. Thinning shears are also a great addition to your toolkit, helping to blend layers and remove bulk without creating harsh lines. I've tried using regular scissors before, and let me tell you, the results were… uneven, to say the least. Spend the extra few bucks; your hair will thank you.
Mirrors, Combs, and Other Must-Haves
You can't cut what you can't see! A good mirror is crucial, especially for the back of your head. A handheld mirror in addition to your bathroom mirror works wonders. A comb is also essential for guiding your clippers and scissors, ensuring an even cut. Wide-toothed combs are great for detangling, while fine-toothed combs offer more precision. Don't forget a spray bottle filled with water to keep your hair damp, a cape or towel to catch falling hair, and some clips to section your hair for easier cutting. Preparation is key!
Tool | Why You Need It |
|---|---|
Clippers with Guards | For cutting the back and sides to a uniform length. |
Hair Cutting Scissors | For trimming the top and adding detail. |
Thinning Shears | For blending layers and removing bulk. |
Mirrors (Handheld and Wall-Mounted) | For seeing all angles of your head. |
Combs (Wide and Fine-Toothed) | For guiding clippers and scissors, detangling hair. |
Spray Bottle | For keeping hair damp during cutting. |
StepbyStep Guide: How to Cut Your Own Hair Male with Clippers

StepbyStep Guide: How to Cut Your Own Hair Male with Clippers
Prep Like a Pro: Washing and Drying
Alright, so you've got your clippers, guards, and a can-do attitude. First things first: wash your hair! Clean hair is way easier to cut evenly. Use shampoo to get rid of any product buildup or grease. Once you're done washing, towel-dry your hair until it's damp but not dripping. Combing through your hair while it's damp will also help remove any tangles and make the cutting process smoother. Think of it like prepping a canvas before painting – a clean, smooth surface makes all the difference.
Clipping the Sides and Back: The Foundation
Now for the fun part! Start with a longer guard length – you can always go shorter, but you can't put hair back on. Begin clipping the sides, working your way up from the bottom. Use a smooth, consistent motion, and try to overlap each pass slightly to avoid creating lines. For the back, use your handheld mirror to guide you. If you're going for a fade, switch to a shorter guard length as you move lower, blending the lengths seamlessly. Remember, patience is key. Don't rush, and take breaks if you need to.
Tackling the Top: Scissors or Clippers?
The top is where you can really customize your style. If you want a shorter, uniform length all over, use the clippers with a guard. If you prefer a longer, more textured look, grab your scissors. For a scissor cut, take small sections of hair between your fingers and trim to the desired length. Point cutting (angling the scissors slightly) can create a softer, more natural look. If you're feeling adventurous, try combining clipper-cut sides with a scissor-cut top for a modern, versatile style. Just remember to blend the transition between the two lengths for a cohesive look.
Step | Description | Tips |
|---|---|---|
Wash Hair | Clean hair is easier to cut evenly. | Use shampoo to remove product buildup. |
Dry Hair | Towel-dry until damp, not dripping. | Comb through to remove tangles. |
Clip Sides & Back | Start with a longer guard length and work your way up. | Use smooth, consistent motions and overlap passes. |
Cut the Top | Use clippers for a uniform length or scissors for texture. | Point cutting with scissors creates a softer look. |
Scissors Only: A Method for Cutting Your Own Hair (Male)
Scissors Only: A Method for Cutting Your Own Hair (Male)
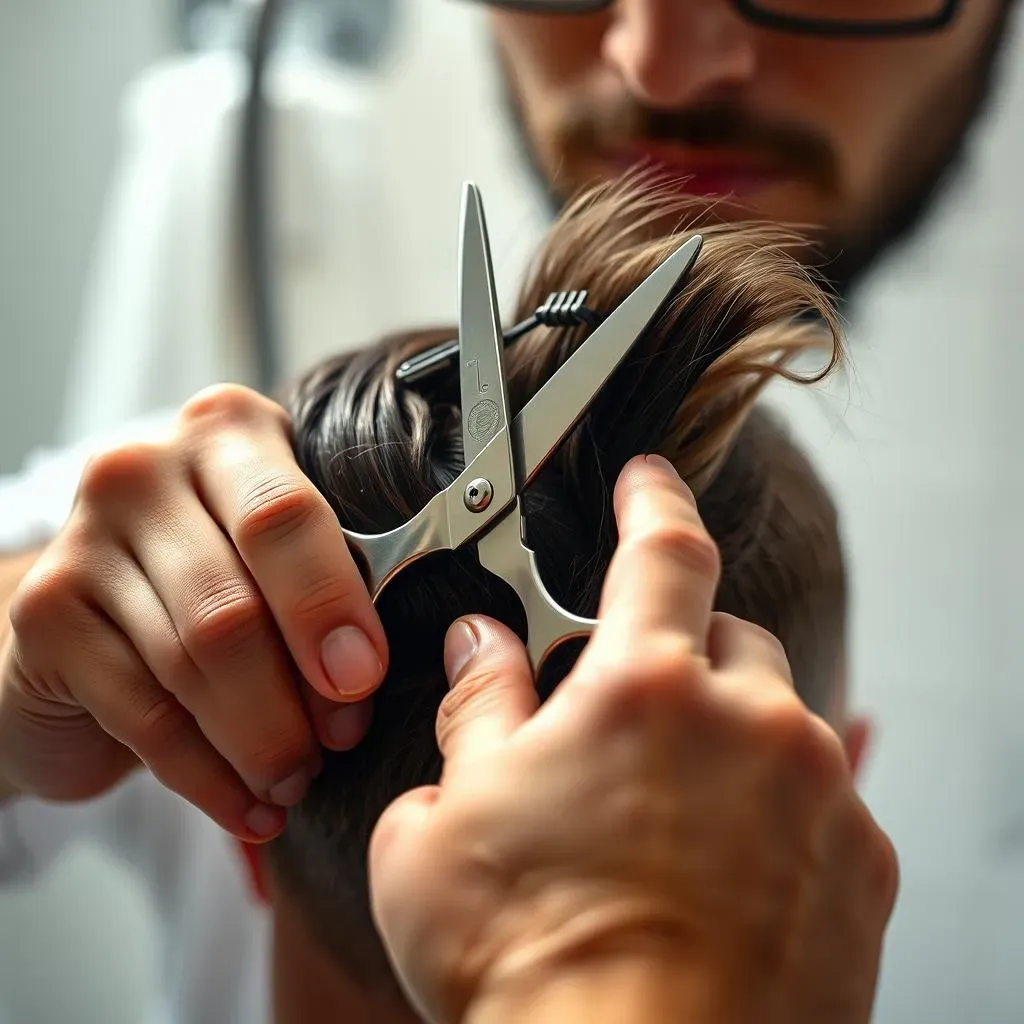
The Art of Scissor Cutting
So, clippers aren't your thing? No problem! You can absolutely achieve a stylish haircut using only scissors. This method is perfect for longer styles or for those who want more control over the length and texture. It requires a bit more finesse and patience, but the results can be incredibly rewarding. Think of it as sculpting, rather than simply trimming. You're shaping the hair, creating layers, and adding movement, all with the precise snip of your shears. It's like being a hair artist!
Sectioning and Preparation
Before you start hacking away, take a moment to section your hair. This is crucial for achieving an even and balanced cut. Use clips to divide your hair into manageable sections – typically, the top, sides, and back. Start with the top section and work your way down. Comb each section thoroughly before cutting, ensuring there are no tangles or knots. Keeping your hair slightly damp will also make it easier to work with. Proper preparation is half the battle when it comes to a successful scissor haircut. I usually section my hair into four parts: top, left side, right side, and back.
Cutting Techniques for Scissors
Now for the cutting! There are a few basic techniques to master. Point cutting, as mentioned earlier, involves holding the scissors at a slight angle and making small, choppy cuts. This creates a softer, more textured look. Another technique is layering, where you lift sections of hair and cut them at different lengths to create volume and movement. For trimming the sides and back, use a comb to guide your scissors, ensuring an even cut. Remember to take small sections at a time and constantly check your progress in the mirror. It's always better to cut too little than too much!
Technique | Description | Benefits |
|---|---|---|
Point Cutting | Holding scissors at an angle and making choppy cuts. | Creates texture and softens lines. |
Layering | Cutting hair at different lengths to create volume. | Adds movement and dimension. |
Comb Guidance | Using a comb to guide scissors for even cuts. | Ensures precision and balance. |
Achieving the Perfect Fade: Techniques for Cutting Your Own Hair
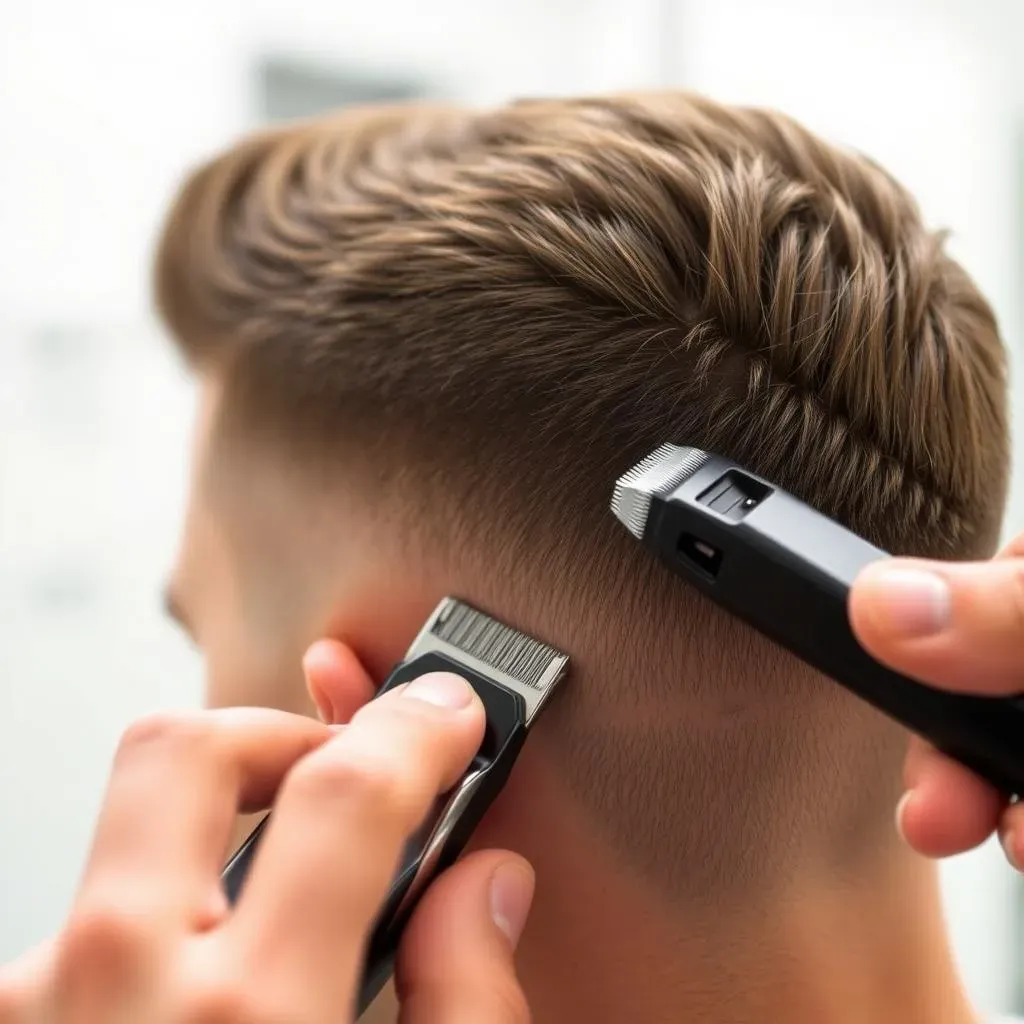
Achieving the Perfect Fade: Techniques for Cutting Your Own Hair
Understanding Fade Basics
Alright, let's talk fades. Achieving the perfect fade might seem like wizardry, but it's really just a gradual transition in hair length. The key is using multiple clipper guard sizes and blending them seamlessly. You'll typically start with a longer guard at the top of the sides and gradually decrease the guard size as you move down towards the hairline. This creates that smooth, blended effect that makes a fade look so clean. Think of it like a gradient – you want a smooth transition, not harsh lines.
Fades come in many styles, low fade, mid fade, high fade, bald fade. Low fade is a subtle transition that starts low on the head, mid fade starts in the middle of the head, high fade starts high on the head, bald fade is when the hair fades all the way to the skin. Each style has its own look and feel, so it's important to choose the one that best suits your face shape and personal style.
Step-by-Step Fade Guide
so here's a breakdown of how to actually execute a fade. Start by choosing your fade height – low, mid, or high. Then, select three clipper guard sizes that will create the transition. For example, you might use a #4 at the top, a #3 in the middle, and a #2 at the bottom. Begin by clipping the bottom section with the shortest guard, working your way up to the desired height. Then, switch to the next guard size and overlap the previous section slightly, blending the two lengths together. Repeat with the final guard size, blending the top section. The key is to use short, flicking motions with the clippers, rather than pressing them flat against your head. This will help create a softer, more gradual transition.
After you've blended the three main sections, you might notice some faint lines between the lengths. This is where your blending skills come in. Use a clipper-over-comb technique to soften those lines. Hold a comb at an angle and run it through your hair, using the clippers to trim any hairs that stick out past the comb. This will create a seamless, natural-looking fade. Practice makes perfect, so don't be discouraged if your first fade isn't flawless. Keep experimenting and refining your technique, and you'll be fading like a pro in no time.
Step | Description |
|---|---|
Choose Fade Height | Decide on low, mid, or high fade. |
Select Guard Sizes | Choose three guards for the transition. |
Clip Bottom Section | Use the shortest guard and work your way up. |
Blend Sections | Overlap each section with the next guard size. |
Clipper-Over-Comb | Softening the lines. |
Troubleshooting and Tips for a Successful DIY Haircut (Male)

Troubleshooting and Tips for a Successful DIY Haircut (Male)
Uh Oh! Fixing Common Mistakes
So, you're halfway through your DIY haircut and things aren't exactly going as planned? Don't panic! We've all been there. One of the most common mistakes is cutting too much off too soon. If you find yourself with a shorter-than-desired 'do, the best thing to do is even it out and rock the new style with confidence. Another common issue is unevenness. If one side is noticeably shorter than the other, try to blend the lengths as best you can. Use your comb and scissors to carefully trim the longer side, matching it to the shorter side. Remember, it's better to err on the side of caution and take small cuts. If all else fails, a hat is always a stylish option!
Another frequent problem is harsh lines, especially when attempting a fade. If you notice distinct lines between different guard lengths, go back and blend them using a clipper-over-comb technique or thinning shears. Focus on softening the edges and creating a gradual transition. And if you accidentally create a bald spot? Well, that's a bit trickier. Depending on the size and location, you might be able to blend it in with the surrounding hair. If not, embrace the asymmetry or consider buzzing the rest of your hair to even things out. It's all part of the DIY adventure!
Mistake | Solution |
|---|---|
Cutting too short | Even it out and own the new style. |
Uneven sides | Carefully trim the longer side to match the shorter side. |
Harsh lines in fade | Use clipper-over-comb or thinning shears to blend. |
Accidental bald spot | Blend it in or embrace the asymmetry. |
Pro Tips for a Polished Look
Want to take your DIY haircut to the next level? Here are a few pro tips to help you achieve a polished, salon-worthy look. First, invest in quality tools. A good set of clippers and shears will make a world of difference in the final result. Second, don't be afraid to experiment. Try different techniques and styles to find what works best for you. Third, take your time. Rushing through a haircut is a recipe for disaster. Fourth, always cut in good lighting. Shadows can make it difficult to see what you're doing, leading to mistakes. And finally, don't be afraid to ask for help. If you're struggling with a particular technique, watch some online tutorials or enlist the help of a friend or family member.
Also, remember that practice makes perfect. The more you cut your own hair, the better you'll become. Don't get discouraged if your first few attempts aren't flawless. Learn from your mistakes and keep refining your technique. And most importantly, have fun! Cutting your own hair can be a rewarding and empowering experience. It's a chance to express your creativity and save some money in the process. So, grab your clippers, scissors, and a can-do attitude, and get ready to transform your look!
Conclusion: Take Control of Your Style
So, you've reached the end of our guide on how to cut your own hair male. Hopefully, you're now armed with the knowledge and confidence to tackle your next trim at home. Remember, practice makes perfect, and don't be afraid to experiment to find what works best for you. While it might take a few tries to nail that perfect fade or precisely shaped style, the savings and convenience of cutting your own hair can be well worth the effort. Embrace the learning process, and enjoy the freedom of maintaining your look on your own terms. Happy cutting!